
This guide provides detailed instructions on installing an oil-water separator and fuel filter in the Caterpillar 311F LRR JFT Excavator. It is crucial that these procedures are carried out by authorized, trained personnel to ensure safety and effectiveness. Before commencing any work on the fuel system, consult the Operation and Maintenance Manual for safety information and adhere to specified cleanliness standards.
Necessary Tools and Components
- Caterpillar ET Diagnostic Software
- CAT Caterpillar ET 3 Diagnostic Adapter
- Replacement O-rings and filter elements
- Standard toolset including torque wrench
Installation Steps
1. Prepare the Fuel Filter Base
- Inspect the fuel filter base for any damage or debris. Clean thoroughly or replace if necessary.
2. Assemble the Fuel Crude Filter
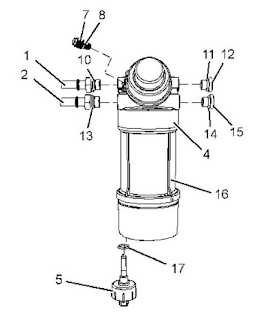
- a. Install the new filter element into the fuel filter tank. Refer to the “Fuel system crude filter replacement” section in the maintenance manual.
- b. Remove the cover from connector (1) and install a new O-ring seal (10).
- c. Remove the screw plug from the fuel oil filter (4) and install connector (1). Tighten to 20 N-m (177 lbin).
- d. Repeat steps for connector (2) with a new O-ring seal (13).
- e. Install connector (2) to the fuel oil filter (4) and tighten as specified.
- f. Fit new O-ring seal (13) to screw plug (12) and install. Tighten to specified torque.
- g. Fit new O-ring seal (14) to screw plug (15) and install. Tighten as above.
- h. Replace the O-ring seal (8) in the vent screw assembly (7).
- i. Install a new O-ring seal (17) on the fuel water content sensor (5) and attach to the fuel crude filter (4). Secure the sensor.
3. Mount the Fuel Oil Filter Assembly
- Secure the assembly (4) to its mounting bracket using bolts (3). Tighten to 50 N-m (37 lbft).
4. Connect the Plastic Tube Assembly
- Ensure correct connection to prevent contamination:
- Disconnect and remove covers from the plastic pipe assembly.
- Connect to the appropriate connectors (1 and 2) on the fuel crude filter (4).
5. Wiring and Final Steps
- Attach the OEM wiring harness assembly (6) to the fuel water content sensor (5).
- Open the fuel supply.
- Activate the battery break switch.
6. Purge the Fuel System
- Follow the steps in the “Fuel System-Charge” section of the Operation and Maintenance Manual to remove air from the system.
Conclusion
After completing the installation, it’s important to test the system for any leaks or operational issues. Regular maintenance and checks as prescribed in the Excavator’s manual will ensure prolonged efficiency and performance of the fuel system. Remember, incorrect installation can lead to serious damage to the engine, so adherence to these steps is crucial.
More topics for Caterpillar, please refer to:Caterpillar Trouble Repair
Leave a Reply