Programming a Caterpillar ECM is more than loading a flash file. A successful repair requires the correct Cat flash file, stable ECM communication, reliable power, a backup of the original configuration, and verification of application-specific parameters after programming.
This guide explains how to safely flash or replace a Caterpillar engine ECM using Cat Electronic Technician (Cat ET) and WinFlash, including what to do when the original ECM is dead.
Quick Answer: How Do You Flash a Cat ECM?
The normal Caterpillar ECM flashing workflow is:
Connect Cat ET to the engine or ECM.
Confirm reliable ECM communication.
Save the original ECM configuration and diagnostic information.
Obtain the correct flash file for the exact engine/application.
Open Cat ET → Utilities → WinFlash.
Select the ECM and correct flash file.
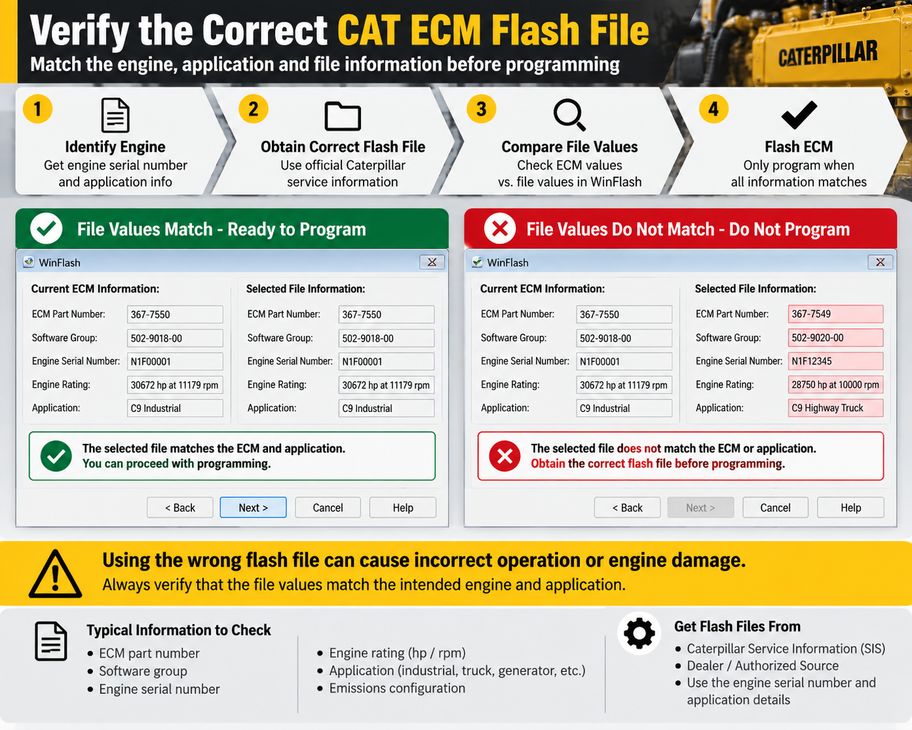
Confirm that the ECM and file information match.
Maintain stable electrical power.
Start the flash and do not interrupt communication or power.
Restore or program the required ECM configuration.
Perform required calibrations.
Check diagnostic codes and verify engine operation.
Caterpillar service procedures specifically require technicians to verify that the selected flash-file values match the application before programming. A mismatched application and flash file can cause incorrect operation or engine damage.
Flashing a Cat ECM vs Programming a Cat ECM
These terms are often used interchangeably, but they are not the same operation.
Operation
What It Does
ECM flashing
Installs the Caterpillar operating software/calibration into the ECM
Transfers configurable data from the original ECM to the replacement ECM
Calibration
Performs application-specific procedures such as engine timing calibration
ECM replacement
Combines physical ECM replacement, flashing, configuration and verification
This distinction matters most when installing a blank or used replacement ECM. Completing WinFlash does not necessarily mean the engine is ready for service.
What You Need to Program a Caterpillar ECM
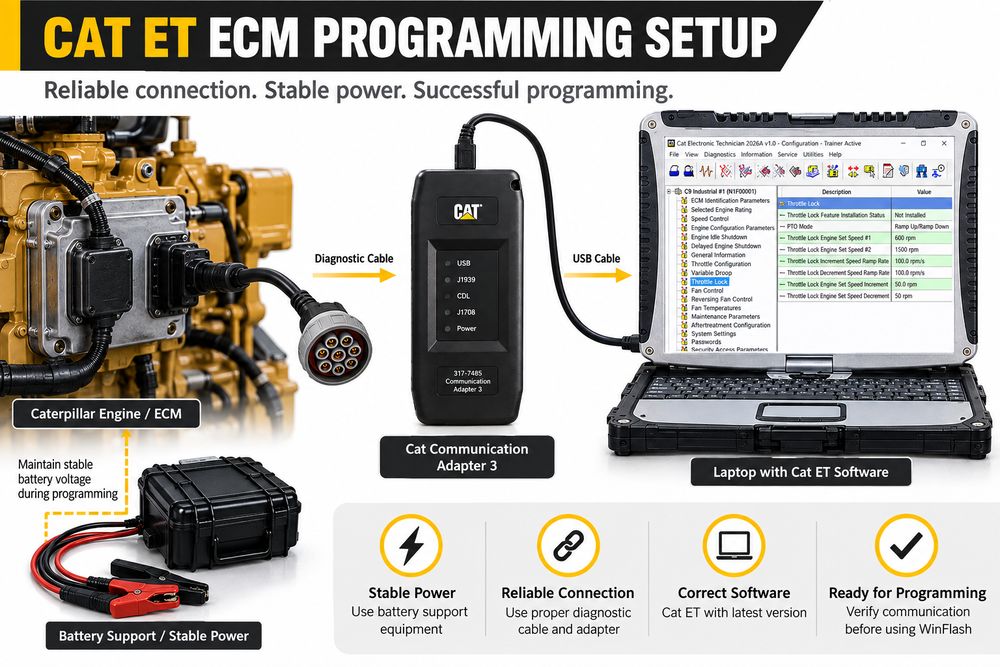
A typical workshop setup includes:
A Windows diagnostic laptop
Cat Electronic Technician
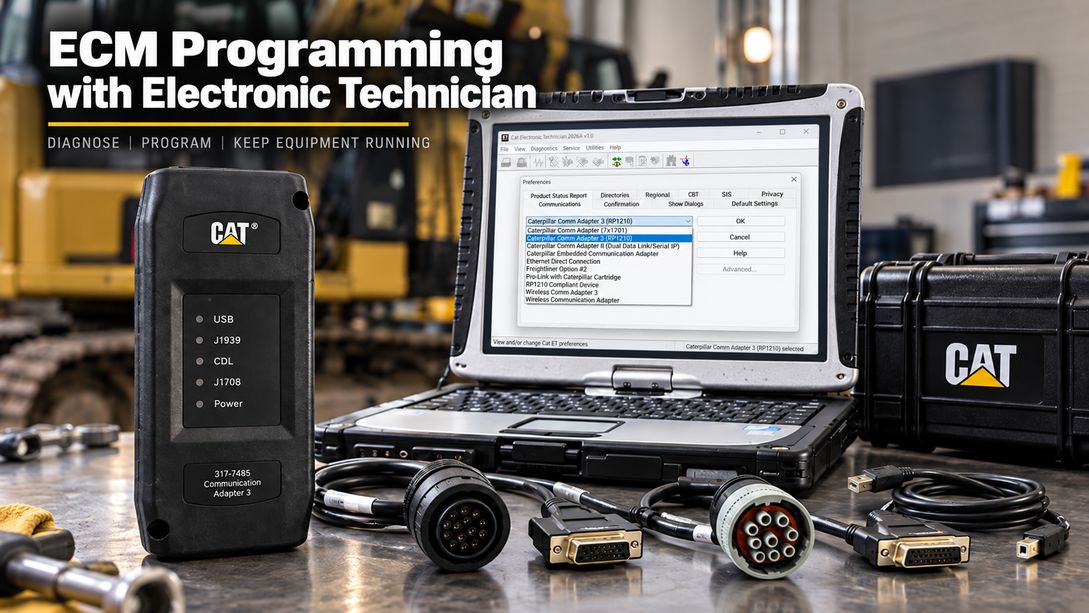
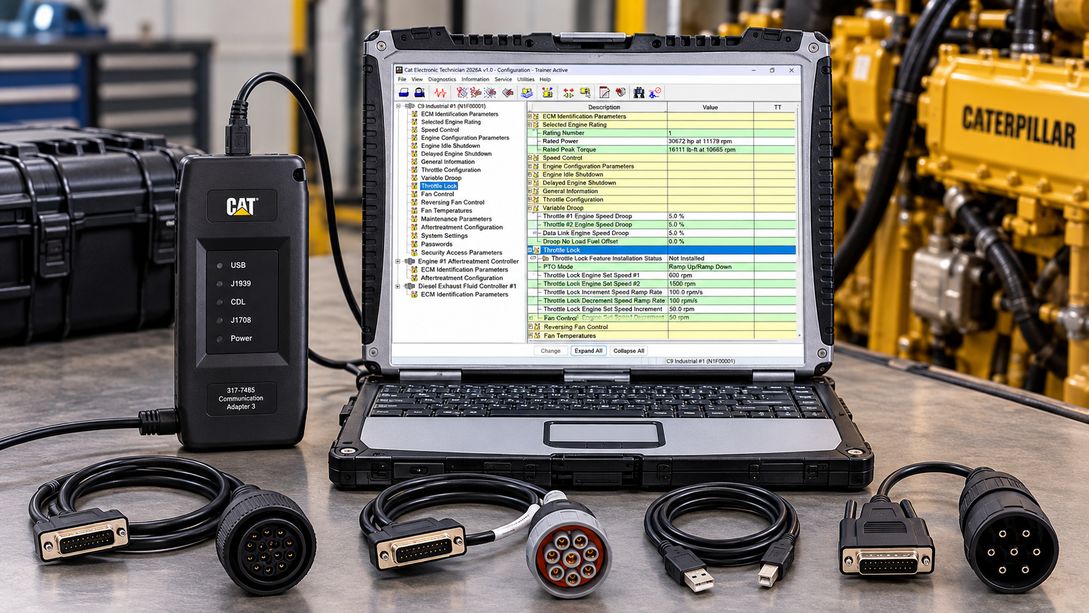
A compatible CAT Communication Adapter 3 capable of maintaining stable communication during diagnostics and WinFlash programming.
Correct vehicle/machine diagnostic cable or approved bench harness
Access to the correct Caterpillar service information and flash file
Reliable power supply or battery support equipment
Engine serial number and machine/equipment identification information
Cat ET is Caterpillar’s electronic service tool for electronically controlled Cat engines and machines. Caterpillar describes its functions as including ECM configuration, diagnostic tests, calibrations, status information, and diagnostic-code access.
For current service procedures, application information, and specifications, use the service information applicable to the exact engine or machine rather than assuming a procedure for one C15, C13, 3126, or C18 applies to every Caterpillar ECM.
Need a Complete CAT ET Programming Setup?
If you are building a CAT diagnostic station from scratch, a complete laptop-and-adapter package is usually the simplest option because the diagnostic hardware, cables and software environment are prepared as one system.
The CAT ET 3 Diagnostic Adapter III + Panasonic CF19 Laptop Kit combines a CAT Communication Adapter 3, Panasonic CF19 laptop, diagnostic cables and CAT ET software options in one workshop-ready package. The current listing offers CAT ET 2019C or 2026B configurations.
Recommended for: workshops that do not already have a dedicated CAT ET laptop or Communication Adapter.
Before Flashing: Make Sure the ECM Is Actually the Problem
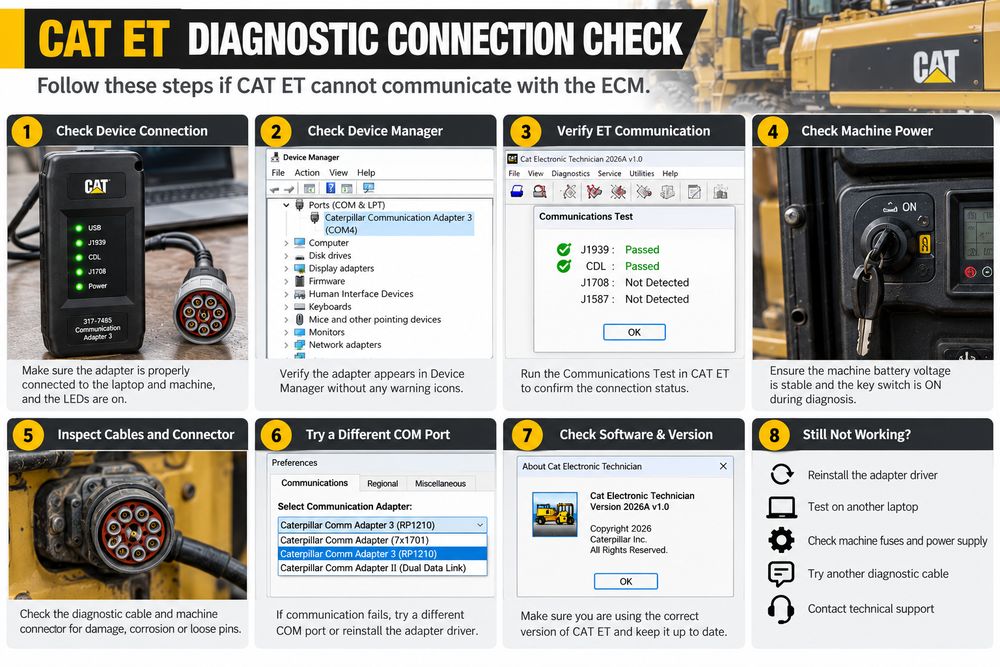
Do not replace or flash an ECM simply because Cat ET reports Unable to Communicate with ECM.
ECMs are expensive, and communication failures often stem from something outside the module. Caterpillar troubleshooting information specifically recommends confirming that the ECM is responsible before replacing it.
Before condemning an ECM, check:
ECM power
Verify permanent battery power and ignition/key-switched power where applicable.
ECM grounds
Check the ground circuits under load. A circuit that measures approximately zero volts with a multimeter but cannot carry current can still prevent communication.
Diagnostic connector power and ground
Make sure the diagnostic interface itself is receiving the required power.
Communication wiring
Inspect J1939, Caterpillar Data Link, or other communication circuits used by the application.
For a J1939 network, technicians can also check CAN-high/CAN-low integrity and termination according to the machine wiring diagram.
ECM connectors
Check for corrosion, backed-out pins, moisture, damaged terminals, and connector tension.
Communication Adapter
Confirm Cat ET can detect the communication adapter before diagnosing the ECM.
Important
Seeing LEDs illuminated on a Cat Communication Adapter does not prove the ECM is communicating. It only confirms certain portions of the interface have power or activity.
Step 1: Connect Cat ET and Verify Communication
Connect the diagnostic adapter between the laptop and the machine.
For bench programming, use the correct bench harness for the specific ECM. Do not assume that the power, ignition, ground, or data-link pinout from another Caterpillar ECM is the same.
Turn the ignition ON while keeping the engine OFF unless the applicable procedure specifies otherwise.
Open Cat ET and establish communication.
If Cat ET identifies the engine ECM correctly, continue.
If communication repeatedly drops out, fix that problem before starting WinFlash. An unstable data link that works for a 30-second diagnostic scan may still fail during several minutes of continuous programming.
Already Have a Laptop? Add the CAT Communication Adapter
Technicians who already have a suitable diagnostic laptop normally do not need to purchase another complete system.
The CAT Communication Adapter 3 / CAT ET3 Diagnostic Adapter III provides the hardware link between Cat ET and supported Caterpillar ECMs. Available package configurations include the adapter, USB cable, J1939/J1708 9-pin cable, 6-pin and 14-pin cables, with CAT ET software options also available.
This is the better choice when your existing laptop is already configured for workshop diagnostics.
Step 2: Back Up the Original ECM Before Doing Anything Else
If the original ECM still communicates, this is one of the most important parts of the entire procedure.
Record or save:
Engine serial number
ECM serial number
Current flash/software information
Configuration parameters
Customer-specified parameters where applicable
Engine lifetime totals
Active diagnostic codes
Logged diagnostic codes
Logged event codes
Engine monitoring settings
Injector trim/calibration information where applicable
FLS/FTS and rating information where applicable
Then use:
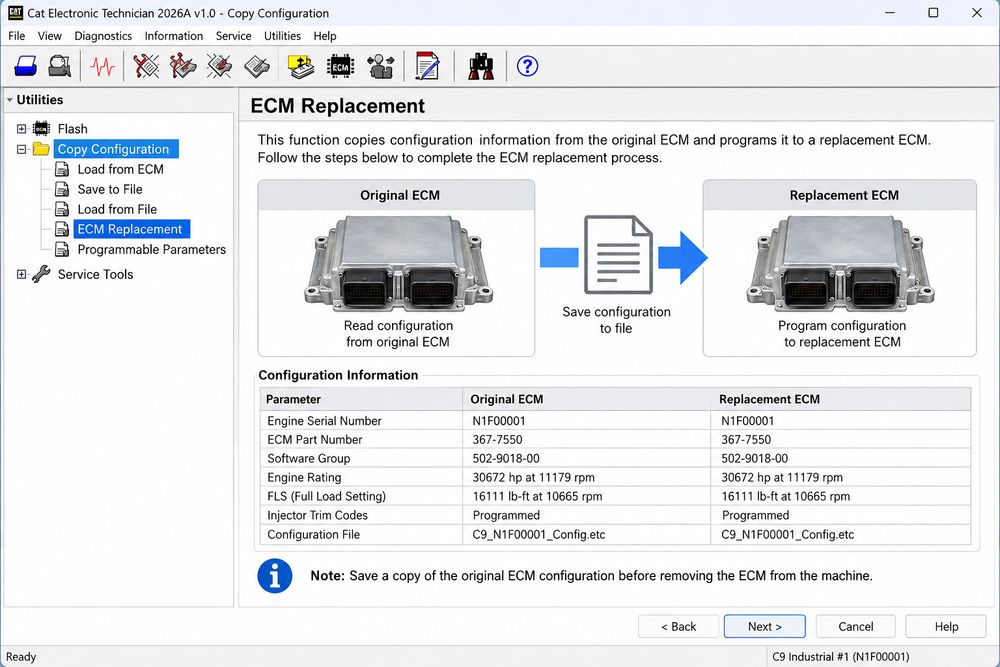
Service → Copy Configuration → ECM Replacement
and load the information from the original ECM.
Caterpillar ECM-replacement procedures specifically call for recording configuration information and using Copy Configuration/ECM Replacement before removing the original ECM. Some applications also require transferring or reprogramming injector trim information after ECM replacement.
Technician Tip
Do not rely only on the saved configuration file.
Take screenshots or create a written parameter worksheet as a second backup. If a configuration-transfer file is incomplete or unusable, those records can save hours of work.
Step 3: Obtain the Correct Caterpillar Flash File
Flash-file selection is where serious programming mistakes can happen.
Identify the machine and engine using the appropriate Caterpillar service information and serial-number records. You often need the engine serial number to locate the correct engine flash software.
Do not choose a flash file simply because:
It belongs to the same engine family.
The ECM part number looks similar.
The horsepower sounds correct.
Another truck or machine uses it.
Someone successfully used the file on a similar engine.
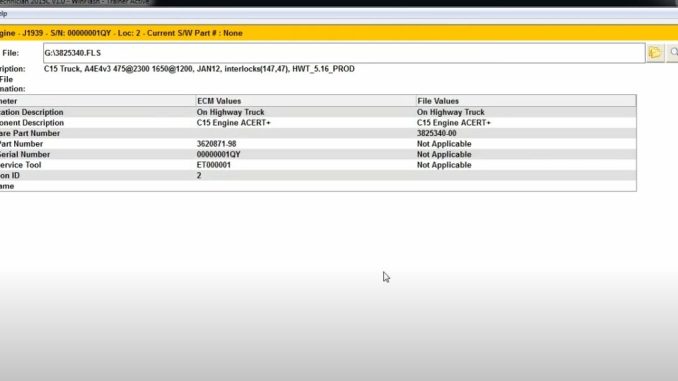
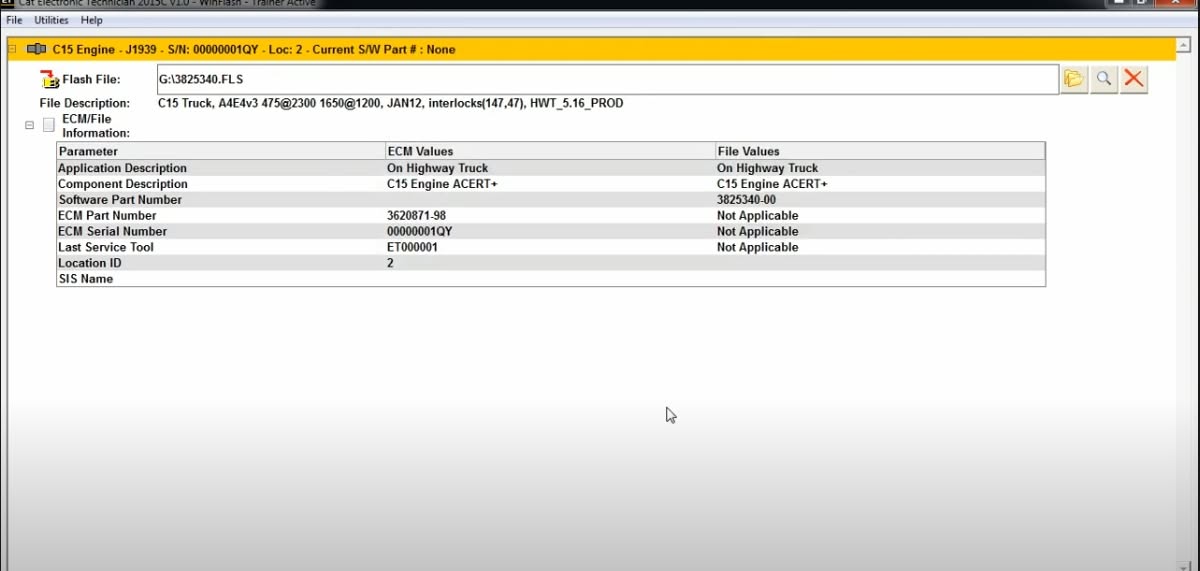
When WinFlash displays the ECM Values and File Values, compare them carefully.
If they do not match the intended engine/application, stop.
Caterpillar’s flash-programming procedure specifically instructs technicians to confirm that the file values match the application and obtain another file when they do not.
Step 4: Stabilize Power Before Starting WinFlash
A programming event should never depend on a weak battery.
Before flashing:
Check battery condition.
Connect suitable battery-support equipment when necessary.
Keep the ignition state required by the service procedure.
Turn off unnecessary electrical loads.
Disable laptop sleep and hibernation.
Connect the laptop to external power when possible.
Avoid loose USB, diagnostic, or bench-harness connections.
For a bench setup, use a regulated supply appropriate for the ECM’s electrical system and current requirements.
Do Not
Do not disconnect:
Battery power
ECM power
Ignition power
Diagnostic interface
USB/network connection
while WinFlash is actively programming the module.
Step 5: Flash the ECM with Cat ET WinFlash
Once communication and power are stable:
Open:
Cat ET → Utilities → WinFlash
Cat ET should search for flash-capable ECMs.
Select the engine ECM.
Click Browse and select the correct flash file.
WinFlash will display information from both the ECM and selected file.
Check the information again.
If the application information is correct, select Begin Flash.
Cat ET will display programming progress.
Do not disturb the machine, laptop, interface, or power supply until Cat ET confirms the operation has finished successfully.
The basic Caterpillar service workflow is to establish communication, open WinFlash, select the ECM, choose the flash file, verify the file information, and program the module.
Need CAT ET Software for WinFlash?
If you already own a compatible Caterpillar communication adapter and laptop, you may only need the diagnostic software.
The available CAT ET Software listing includes 2019C and 2026B versions. The 2026B option is listed with one-time remote installation/activation for one PC and supports multiple interface languages.
After WinFlash reports successful completion, follow the key-cycle instructions shown by Cat ET or the applicable Caterpillar service procedure.
Reconnect to the engine ECM.
Confirm that Cat ET now displays the expected:
ECM
Engine serial number
Software group
Application/rating
Configuration information
Do not assume that a Flash Completed Successfully message means the entire ECM replacement job is finished.
Step 7: Restore the ECM Configuration
If you successfully saved the original ECM configuration:
Go back to:
Service → Copy Configuration → ECM Replacement
Load the saved replacement data and select Program ECM as appropriate.
Caterpillar replacement procedures use this workflow to transfer the original configuration to the replacement ECM.
If the original ECM was completely dead, you will need to reconstruct the configuration from reliable application-specific information.
Possible sources include:
Engine information plate
Original machine documentation
Caterpillar service information
Factory/dealer records
Previously saved Product Status Reports
Previous Cat ET configuration records
Never Copy Parameters from a Random “Similar Engine”
Two engines that appear identical can have different:
Ratings
Emissions configurations
OEM parameters
Engine monitoring strategies
Injector data
Application codes
Using another engine’s configuration as a shortcut can introduce faults that are much harder to diagnose than the original ECM failure.
Step 8: Verify Critical Configuration Parameters
The parameters that require attention depend on the application and ECM generation.
Typical examples can include:
Engine Serial Number
The replacement ECM must contain the correct engine identification where required.
Engine Rating
Verify the intended factory-approved rating rather than attempting an arbitrary horsepower change.
FLS — Full Load Setting
FLS represents factory fuel-system adjustment information on applications that use the parameter.
FTS — Full Torque Setting
FTS is another factory-defined adjustment used on applicable engines.
Caterpillar service information warns that incorrect FLS/FTS values can affect the engine and that these values should match the engine’s approved configuration. Some protected changes require factory authorization/passwords.
Do not use ECM programming as a method of defeating emissions controls, exceeding an approved rating, or entering fabricated FLS/FTS values.
Step 9: Check Injector Trim Information
This step is frequently missed during ECM replacement.
On Caterpillar engines that use injector trim codes or trim files, the replacement ECM must contain the correct injector information.
Caterpillar explains that these values compensate for manufacturing differences between individual injectors. Some ECM replacement procedures therefore require recording injector codes or trim files and programming them into the replacement ECM.
After programming, compare the Cat ET injector information with the recorded original data or the appropriate engine records.
Wrong or missing injector calibration data can contribute to poor running, even if the ECM flash completed normally.
Step 10: Perform Required Calibrations
Whether additional calibration is necessary depends on the engine and what data transferred successfully.
One common example is engine speed/timing calibration.
Some Caterpillar applications require timing calibration after installation of a replacement ECM—particularly when the previous ECM was dead and the original timing information could not be transferred. Cat ET may display a timing-calibration-required diagnostic code.
Use the exact Caterpillar procedure for that engine.
Do not assume timing calibration is required—or not required—solely because another Caterpillar engine used a particular workflow.
Step 11: Perform a Complete Post-Programming Verification
Before returning the machine or truck to service:
Reconnect Cat ET and confirm:
Correct ECM identification
Correct engine serial number
Correct flash/software information
Correct engine rating
Correct application configuration
Correct FLS/FTS where applicable
Correct injector calibration data
No unexpected active diagnostic codes
Required calibrations completed
Then start the engine.
Monitor important live data such as:
Engine speed
Battery voltage
Engine oil pressure
Coolant temperature
Fuel-system data
Desired versus actual values relevant to the repair
Allow the engine to reach the conditions required by the applicable service procedure and confirm normal operation.
Finally, create and save a Product Status Report or equivalent service record showing the machine’s condition after programming.
What If the Original CAT ECM Is Completely Dead?
A dead original ECM makes the job more complicated because Cat ET cannot perform Load from ECM.
The correct approach is:
1. Prove the ECM is actually dead
First, verify power, grounds, connectors, and communication wiring.
2. Identify the exact engine and application
Use the engine serial number, machine serial number, and ECM/application information.
3. Obtain the correct flash software
Never substitute a file from an apparently similar engine.
4. Flash the replacement ECM
Use Cat ET/WinFlash and verify File Values before programming.
5. Reconstruct the configuration
Use engine identification plates, official service information, and reliable historical records.
6. Program required calibration information
This may include injector data or other application-specific parameters.
7. Perform required calibrations
Follow Cat ET and the Caterpillar service procedure for the exact engine.
If the original ECM cannot communicate, you may need to obtain some parameters from Caterpillar/OEM records rather than copying them from another engine.
CAT ECM Flashing Problems and Practical Diagnosis
Problem
What to Check
Cat ET cannot find ECM
ECM power, switched power, grounds, communication wiring, adapter configuration and connectors
Communication repeatedly disconnects
Weak batteries, poor grounds, loose diagnostic cable, USB power management, damaged data link
WinFlash cannot detect ECM
Confirm normal Cat ET communication first; verify correct adapter and ECM connection
File Values do not match ECM/application
Stop programming and obtain the correct flash file
Flash stops unexpectedly
Stabilize power and communication; reconnect and follow the recovery state shown by Cat ET/service information
ECM shows Flash Required
Verify the correct file and complete WinFlash programming
Factory Password requested
Confirm that the requested parameter change is legitimate and appropriate for the application
Engine starts but runs poorly
Check rating/configuration, injector trim data, timing/calibration requirements and active codes
New ECM has wrong or missing serial number
Program the correct identification according to the engine’s service procedure
Fault codes appear after replacement
Compare configuration with the original records and perform required calibrations
Common CAT ECM Programming Mistakes
The most expensive problems usually happen before the technician presses Begin Flash.
Avoid these mistakes:
Replacing the ECM before testing its power, ground, and data link.
Flashing without backing up the original configuration.
Choosing a flash file by engine model alone.
Programming with weak batteries.
Using an unreliable bench harness.
Ignoring the WinFlash File Values screen.
Assuming a completed flash restores every configuration parameter.
Forgetting injector trim/calibration information.
Guessing FLS, FTS, or engine-rating values.
Copying parameters from another “similar” engine.
Skipping post-flash diagnostic-code checks.
Returning the machine to service without saving a final report.
Which CAT ET Setup Should a Workshop Choose?
Your best setup depends on what diagnostic equipment you already have.
Your Situation
Best Choice
Starting from scratch
CAT ET3 + Panasonic CF19 Complete Kit — laptop, Communication Adapter and diagnostic cables in one setup
Already have a diagnostic laptop
CAT Communication Adapter 3 — add the CAT interface and required machine/truck cables
Already have compatible CAT hardware
CAT ET 2026B Software — software-only option for diagnostics, configuration, calibration and supported WinFlash operations
Yes. Cat ET provides ECM configuration, diagnostic, and calibration functions, while WinFlash installs compatible flash software into supported Caterpillar ECMs.
Do I need WinFlash separately?
You access WinFlash through Cat ET on supported applications, usually from the Utilities menu.
Can I flash a completely blank CAT ECM?
You can program a compatible replacement ECM when the appropriate Caterpillar procedure, correct software, and required configuration information are available. A blank ECM generally requires more than simply installing the flash file.
Can I use the configuration from another C15 or C13?
Do not use another engine’s configuration unless an official Caterpillar procedure specifically directs you to do so. The correct parameters must match the actual engine and application.
What happens if I select the wrong flash file?
Stop before programming if the WinFlash File Values do not match the intended application. Caterpillar warns that an incorrect flash/application combination can damage the engine.
Do I need to program FLS and FTS after every flash?
Not necessarily. Flash updating and ECM replacement are different operations. FLS/FTS are configuration parameters on applicable engines and should be changed only when the service procedure requires it, such as during certain ECM replacements or approved rerating situations.
Why does Cat ET ask for Factory Passwords?
Certain protected configuration changes require Caterpillar authorization. Do not bypass these protections or change rating- or emissions-related parameters without proper authorization and application data.
Does an ECM replacement require timing calibration?
It depends on the engine and whether the calibration information was transferred successfully. Some engines require timing calibration after an ECM replacement when the previous ECM could not communicate. Follow the procedure for the exact engine.
Final Technician Checklist
A Caterpillar ECM programming job isn’t finished just because WinFlash reaches 100%.
The safest sequence is:
Diagnose → Back Up → Verify Flash File → Stabilize Power → Flash → Restore Configuration → Calibrate → Verify
The two steps that prevent the most expensive mistakes are also the simplest:
Save everything you can from the original ECM before replacement, and never flash a file until you’ve verified its application information.
That approach turns ECM programming from a risky trial-and-error operation into a controlled, repeatable workshop procedure.
Leave a Reply