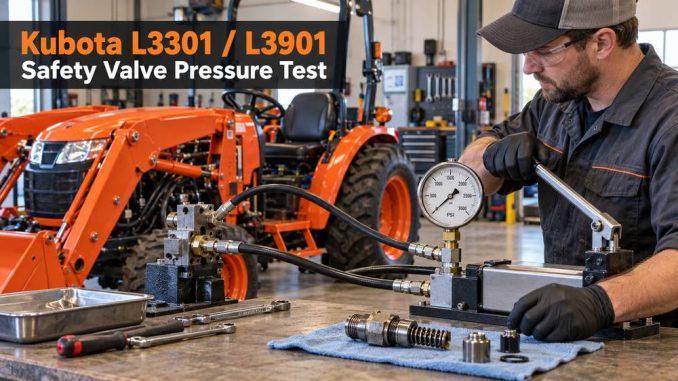
If a Kubota L3301 or L3901 tractor has weak hydraulic performance or abnormal hydraulic pressure, you may need to check the safety valve setting pressure.
This procedure explains how to remove the safety valve, test its operating pressure with an injection nozzle tester, adjust the Valve when required, and reinstall it correctly.
Important: Always use the factory pressure specification for the exact tractor and hydraulic circuit. Do not adjust the safety valve to an assumed pressure.
Tools Required
Prepare the following before testing:
- Injection nozzle tester
- Safety valve setting adapter
- Suitable hand tools
- Specified Kubota transmission/hydraulic fluid
- Replacement O-ring if required
- Eye and hand protection
- Kubota L3301/L3901 service specifications
The pressure tester and adapter must be suitable for the required hydraulic pressure.
1. Remove the Safety Valve Assembly
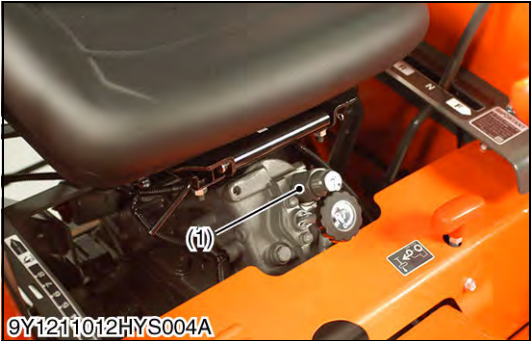
Remove the safety valve assembly (1) from the rear hydraulic block.
Clean the surrounding area before removal to prevent dirt or debris from entering the hydraulic system.
Inspect the Valve for:
- damaged threads
- contamination
- external leakage
- corrosion
- damaged O-ring
Keep the Valve clean during testing.
2. Connect the Safety Valve to the Tester
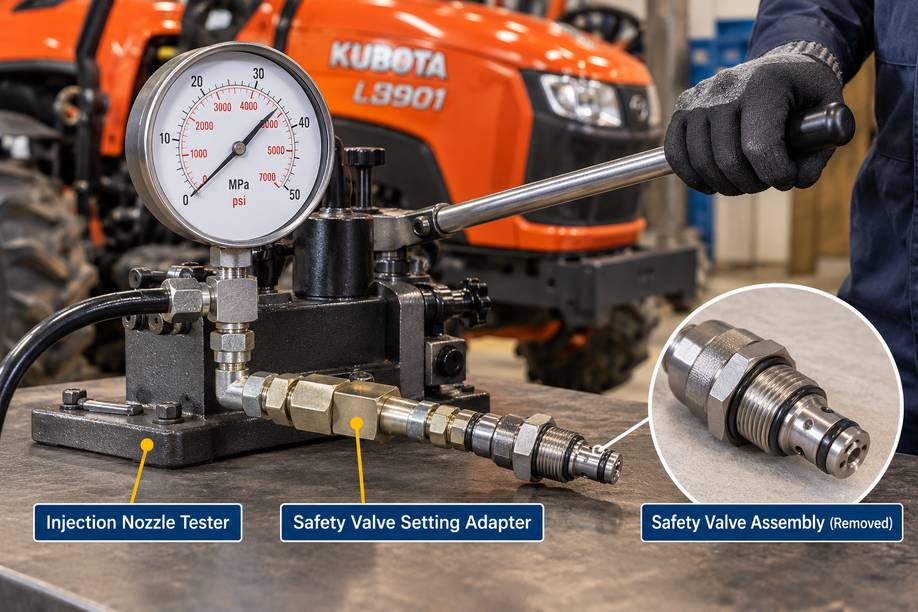
Attach the safety valve to an injection nozzle tester using the correct safety valve setting adapter.
The test setup should be:
Injection Nozzle Tester → Safety Valve Setting Adapter → Safety Valve
Make sure all fittings are secure and leak-free.
Do not use improvised fittings that are not rated for the required pressure.
3. Measure the Safety Valve Operating Pressure
Operate the Tester slowly and gradually increase pressure.
Observe the pressure at which the safety valve begins to open.
Compare the measured pressure with the factory specification for the applicable Kubota hydraulic circuit.
If the operating pressure is within specification, adjustment is normally unnecessary.
If the pressure is outside specification, continue with the adjustment procedure.
4. Adjust the Safety Valve Pressure
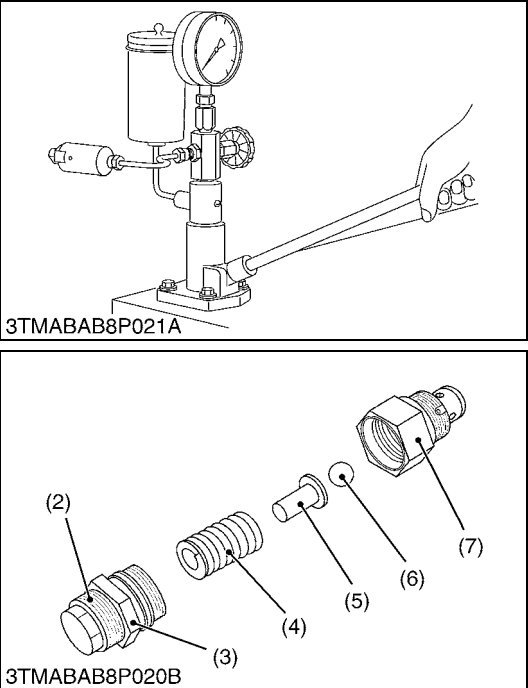
If the measured pressure is not within the factory specification, adjust the Valve by turning the adjusting screw (2).
Make small adjustments only.
After each adjustment:
- Test the Valve again.
- Check the opening pressure.
- Compare the result with the factory specification.
- Repeat if necessary.
Do not increase the valve pressure above the specified range.
Excessive hydraulic pressure can place unnecessary stress on:
- hydraulic pump
- control valves
- cylinders
- hoses
- seals
- fittings
5. Tighten the Lock Nut
Once you reach the correct pressure, hold the adjusting screw in place and tighten the lock nut (3) firmly.
After tightening the lock nut, test the Valve again.
This final check is important because tightening the lock nut can slightly change the setting.
6. Reinstall the Safety Valve
When reinstalling the safety valve:
- inspect the O-ring carefully
- replace it if damaged or hardened
- apply the specified transmission/hydraulic fluid to the O-ring
- avoid twisting or cutting the seal
- install the Valve carefully into the rear hydraulic block
Use the appropriate Kubota tightening specification where required.
Original Image Position 1
Insert original image here:
Original Image Position 2
Insert original image here:
Important Test Note
Use the specified transmission/hydraulic fluid when testing the cylinder safety valve operating pressure.
Using the correct fluid helps prevent contamination and provides more consistent test results.
Refer to the applicable Kubota lubricant specification for the correct fluid.
Original Image Position 3
Insert original image here:
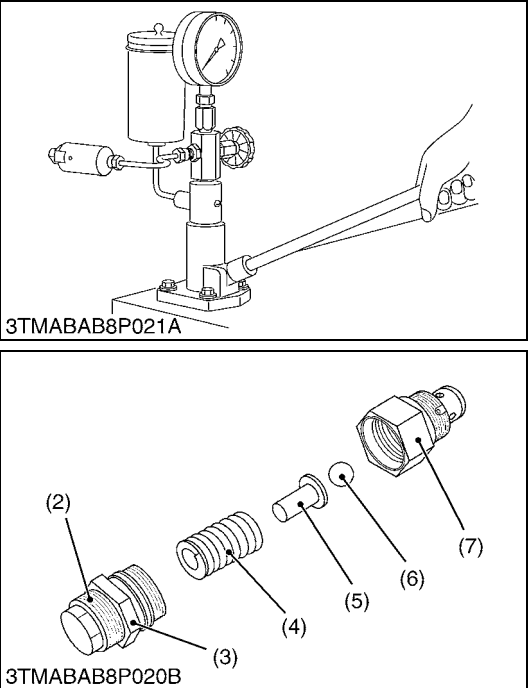
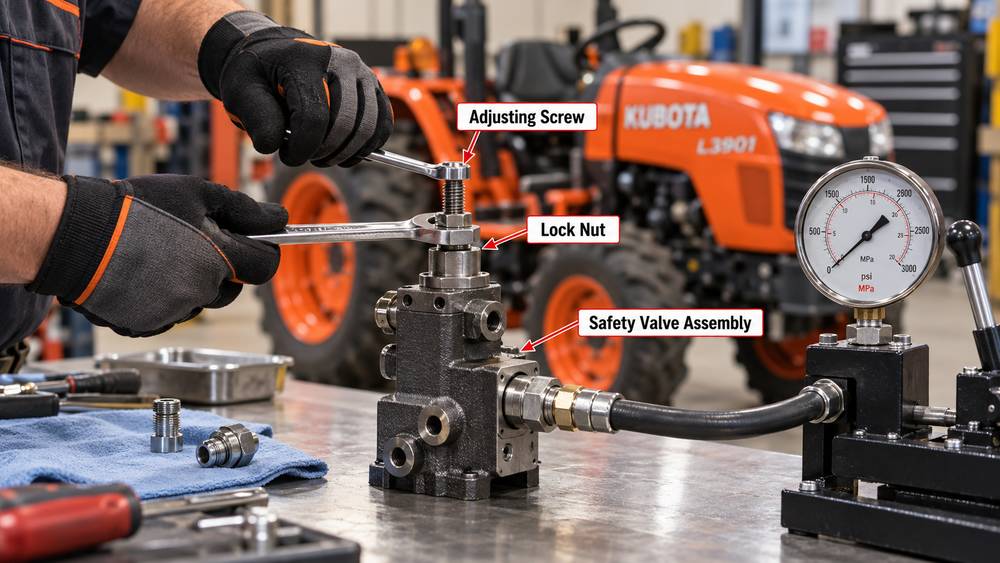
Safety Valve Components
The safety valve assembly includes:
- (1) Safety Valve Assembly
- (2) Adjusting Screw
- (3) Lock Nut
- (4) Spring
- (5) Seat
- (6) Ball
- (7) Housing
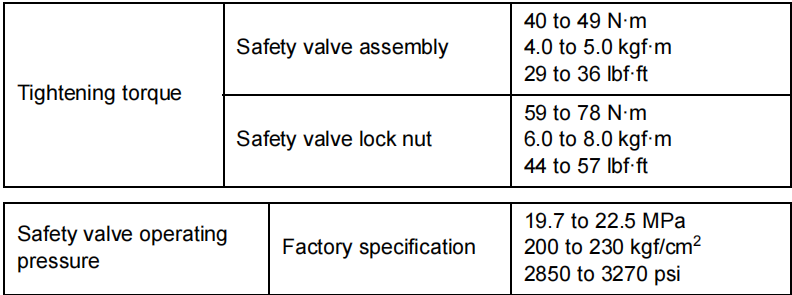
The adjusting screw changes spring preload, which affects the pressure at which the Valve begins to relieve hydraulic pressure.
For this reason, always adjust the Valve using a pressure tester rather than turning the screw based only on hydraulic symptoms.
What to Check After Reassembly
After reinstalling the safety valve, start the tractor and operate the hydraulic system.
Check for:
- hydraulic oil leakage
- abnormal pump noise
- slow hydraulic response
- weak lifting performance
- jerky hydraulic movement
- excessive hydraulic temperature
If the system operates normally and shows no leaks, the repair is complete.
What If the Hydraulic System Is Still Weak?
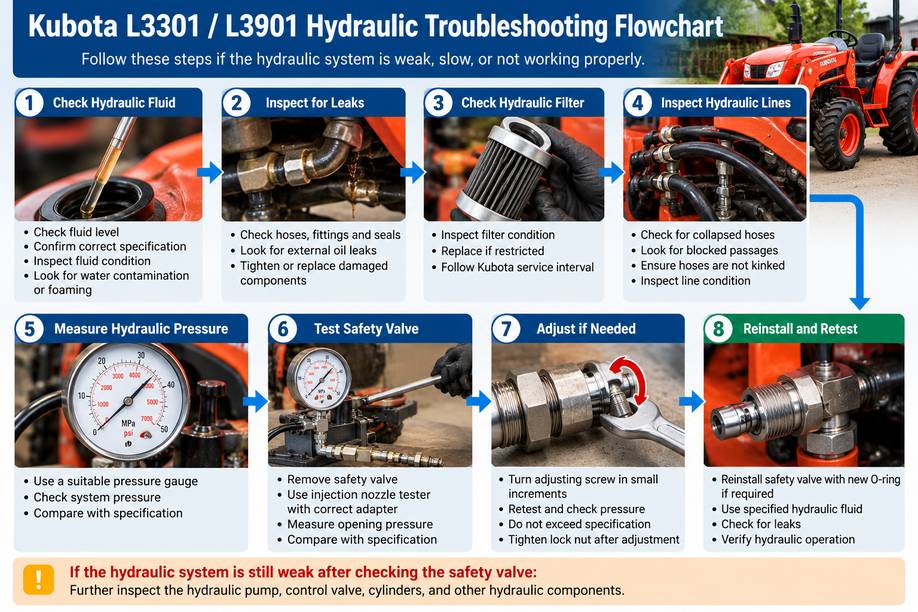
Do not continue increasing the safety-valve pressure.
If the valve setting is correct but hydraulic performance remains poor, inspect other possible causes.
Hydraulic Pump
A worn pump may not provide enough pressure or flow.
Hydraulic Filter
A restricted filter can reduce hydraulic performance.
Hydraulic Fluid
Check:
- fluid level
- fluid condition
- correct specification
- contamination
Control Valve
Internal leakage in the control valve can reduce available pressure.
Hydraulic Cylinder
Worn piston seals can allow internal bypass.
Hoses and Lines
Inspect for:
- restrictions
- collapsed hoses
- damaged fittings
- blocked passages
Common Mistakes to Avoid
Adjusting the Valve Without Testing Pressure
Weak hydraulics do not automatically mean the safety-valve setting is too low.
Always measure first.
Increasing Pressure Above Specification
Higher relief pressure does not automatically improve hydraulic performance and may damage the system.
Using the Wrong Test Fluid
Use the transmission/hydraulic fluid specified for the Kubota system.
Reusing a Damaged O-Ring
Replace damaged seals before reinstalling the Valve.
Skipping the Final Retest
Always check the valve pressure again after tightening the lock nut.
Hydraulic Pressure Testing vs Kubota Electronic Diagnostics
The safety valve procedure described above is a mechanical hydraulic test.
Diagnostic software cannot replace:
- an injection nozzle tester
- a hydraulic pressure gauge
- a safety valve adapter
- physical hydraulic-system inspection
However, electronic diagnostics can help when the tractor also has:
- ECU fault codes
- warning lights
- sensor faults
- communication problems
- electronically controlled system problems
Kubota workshops often use mechanical hydraulic testing and electronic diagnostics together.
Kubota KOBD ACE Diagnostic Software
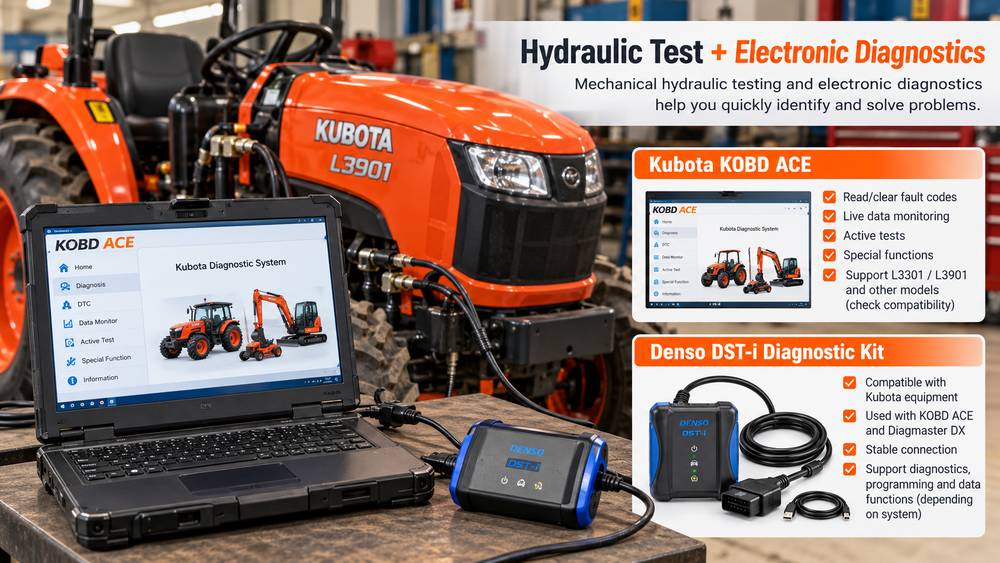
For electronic diagnostics on supported Kubota equipment, obdii.shop offers:
Kubota KOBD ACE Diagnostic Software
https://www.obdii.shop/goods-846-Kubota-Diagnostic-Software-KUBOTA-KOBD-ACE.html
The product listing includes Kubota L3301/3901 among supported L-Series applications.
KOBD ACE supports ECU diagnostics, fault-code checking, and electronic data monitoring.
Before purchase, confirm the exact machine, controller, interface, and required diagnostic functions.
Denso DST-i Diagnostic Interface
For workshops that also require a compatible Kubota diagnostic interface, see:
Denso DST-i Diagnostic Kit with Diagmaster DX
The DST-i is intended for electronic diagnostic communication on supported equipment.
It does not replace the pressure tester required for this safety-valve procedure.
Quick Diagnostic Workflow
For weak hydraulic performance on a Kubota L3301/L3901:
Check hydraulic fluid
↓
Inspect for leaks
↓
Check filter and lines.
↓
Measure hydraulic pressure
↓
Test safety valve opening pressure
↓
Adjust only if outside specification.
↓
Reinstall and retest
↓
Use electronic diagnostics if ECU-related symptoms are also present.
FAQ
How do you test the Kubota L3301/L3901 safety valve?
Remove the Valve, connect it to a suitable injection nozzle tester with the correct adapter, and compare the opening pressure with the factory specification.
Can I adjust the ValveValve without a pressure tester?
No. Adjust the ValveValve based on the measured pressure.
Can low safety-valve pressure cause weak hydraulics?
Yes. If the ValveValve opens too early, the hydraulic system may not reach the required operating pressure.
Can KOBD ACE adjust this safety valve?
No. This safety valve requires mechanical pressure testing and physical adjustment.
What should I check if hydraulic performance remains weak?
Inspect the hydraulic pump, filter, fluid condition, control valve, cylinders, hoses, and other hydraulic components.
Conclusion
Testing the Kubota L3301/L3901 safety valve setting pressure is straightforward when you have the correct Tester, adapter, fluid, and factory specifications.
The correct procedure is:
Remove Valve → Connect Tester → Measure Pressure → Adjust if Required → Tighten Lock Nut → Retest → Reinstall → Verify Hydraulic Operation.
Do not increase the safety-valve pressure simply because the hydraulic system feels weak. Confirm the actual pressure first, then diagnose the rest of the hydraulic system if needed.
For supported electronic diagnostics, see:
Kubota KOBD ACE Diagnostic Software
https://www.obdii.shop/goods-846-Kubota-Diagnostic-Software-KUBOTA-KOBD-ACE.html
Denso DST-i Diagnostic Kit with Diagmaster DX
Leave a Reply