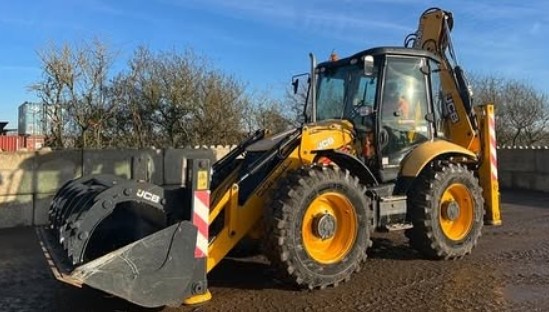
Removing a JCB backhoe dipper requires careful hydraulic-pressure release, correct lifting support and accurate reassembly of the pivot pins and retaining hardware.
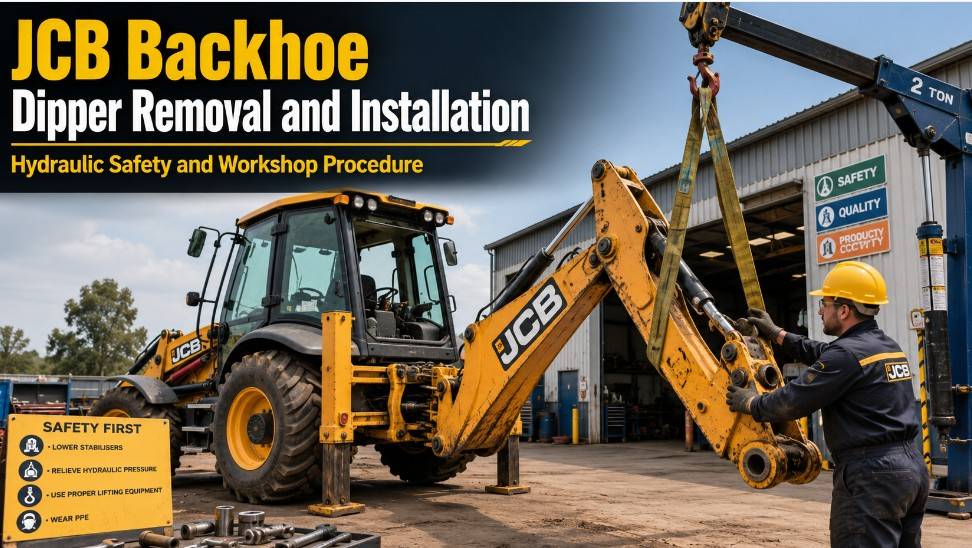
The following procedure describes removal of the dipper with the Extradig assembly, if fitted, and the bucket ram still installed. These components may also be removed separately by following the relevant JCB workshop manual procedures.
This guide is intended for trained technicians working with the correct tools, lifting equipment and model-specific JCB service information.
Safety Precautions
Before starting:
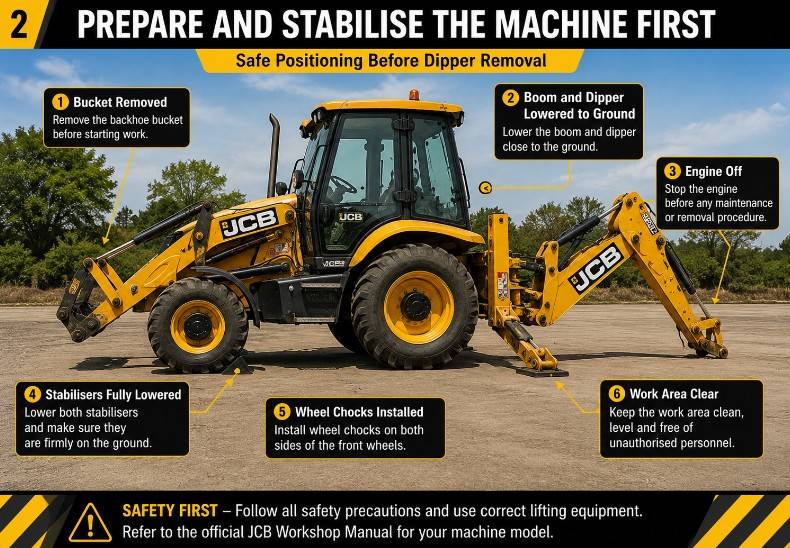
- Park the machine on firm, level ground.
- Lower the stabilisers.
- Stop the engine.
- Disconnect the battery.
- Release trapped hydraulic pressure.
- Use lifting equipment rated for the complete dipper assembly.
- Wear suitable eye, hand and foot protection.
- Keep all personnel clear of the suspended component.
Machine specifications and component arrangements can vary. Always confirm the procedure, lifting points and tightening specifications for the exact JCB model and serial number.
Required Equipment
Prepare the following equipment before beginning:
- Suitable lifting hoist or crane
- Correctly rated lifting sling
- Dipper-ram support
- Hydraulic hose caps and plugs
- Hose identification labels
- Hand tools
- Torque wrench
- Replacement pivot-pin seals, if required
- JCB service information for the machine model
JCB Dipper Removal Procedure
1. Remove the Backhoe Bucket
Remove the backhoe bucket using the applicable JCB workshop procedure.
Position the backhoe so that the boom and dipper are safely supported and accessible for removal.
2. Lower the Stabilisers
Lower both stabilisers until the machine is stable.
Do not rely solely on the hydraulic system to support the backhoe during disassembly.
3. Stop the Engine and Disconnect the Battery
Switch off the engine and remove the ignition key.
Disconnect the battery to prevent anyone from accidentally starting the machine while hydraulic hoses and pivot pins are disconnected.
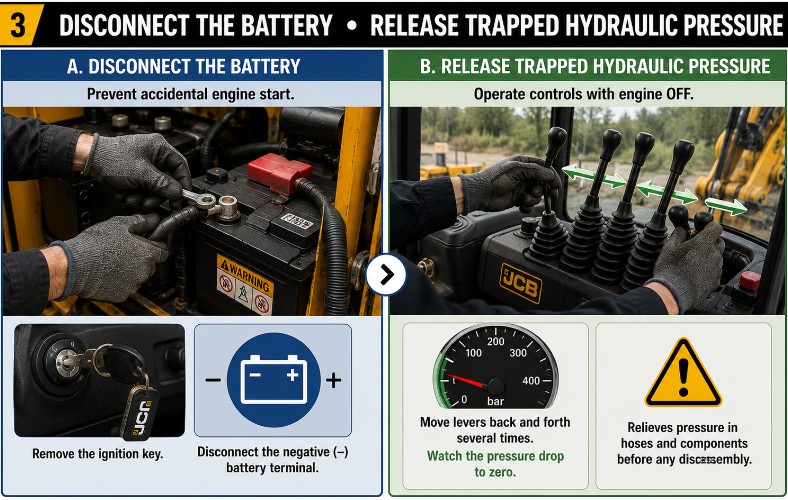
4. Release Hydraulic Pressure
Move the backhoe control levers repeatedly in all directions after the engine has been stopped.
This helps release residual hydraulic pressure trapped inside the hoses and cylinders.
Hydraulic-Pressure Warning
Hydraulic fluid under pressure can cause serious injury.
Before disconnecting any hydraulic hose:
- Stop the engine.
- Isolate the battery.
- Operate the controls to release trapped pressure.
- Allow the hydraulic system to cool.
- Wear eye and hand protection.
- Confirm that the machine cannot be started.
Never loosen a hose connection while the hydraulic system is pressurized.
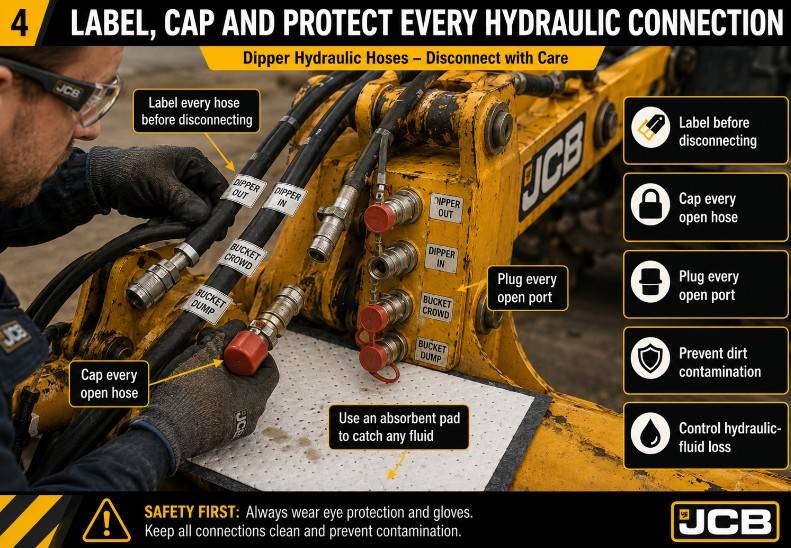
5. Disconnect and Label the Hydraulic Hoses
Disconnect the hydraulic hoses connected to the dipper and bucket-ram assembly.
Label every hose before removal so that each line can be reconnected to the correct port.
Immediately install clean plugs and caps on all open hoses and fittings. This prevents:
- Dirt entering the hydraulic system
- Hydraulic-fluid contamination
- Excessive fluid loss
- Incorrect hose reconnection
Do not leave hydraulic ports uncovered.
6. Support the Dipper Ram
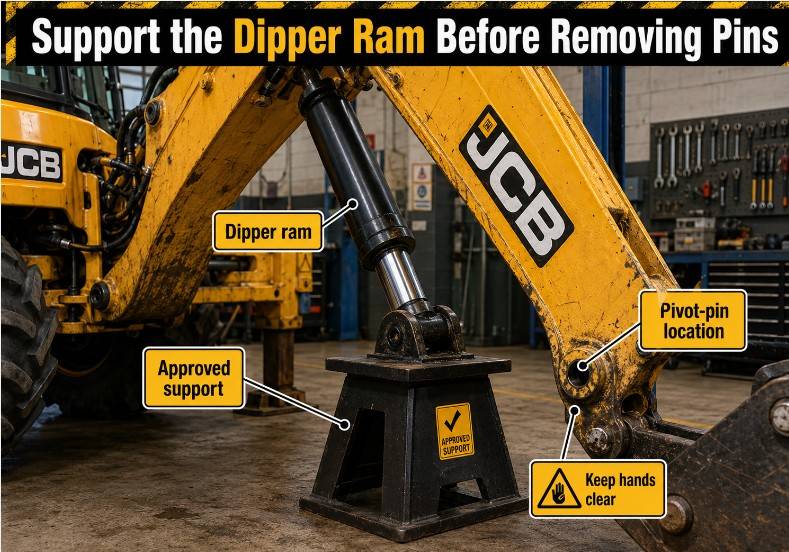
Place a suitable support beneath the dipper ram.
Make sure the ram cannot move or fall after the pivot pins are removed.
7. Attach the Lifting Sling
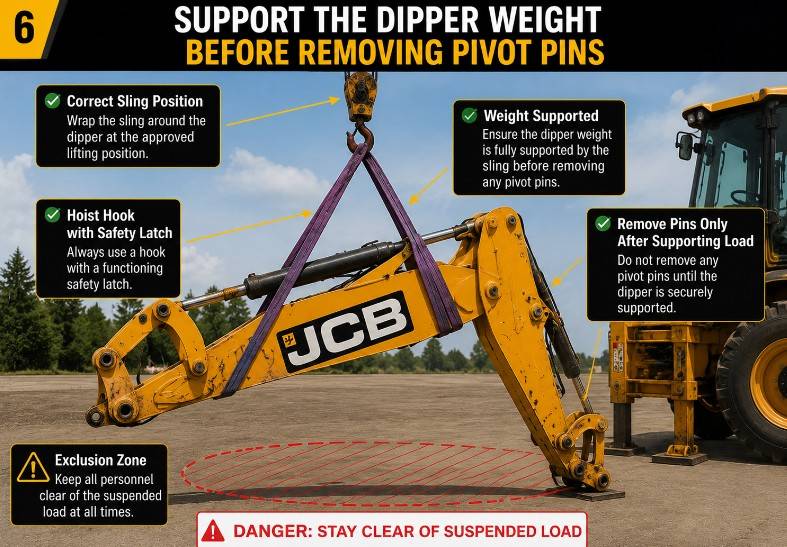
Wrap a correctly rated sling around the dipper at the approved lifting position.
Connect the sling to the lifting equipment and carefully take up the weight of the dipper.
Do not remove any pivot pin until the sling is supporting the complete assembly.
8. Remove the Dipper-Ram Pivot Pin
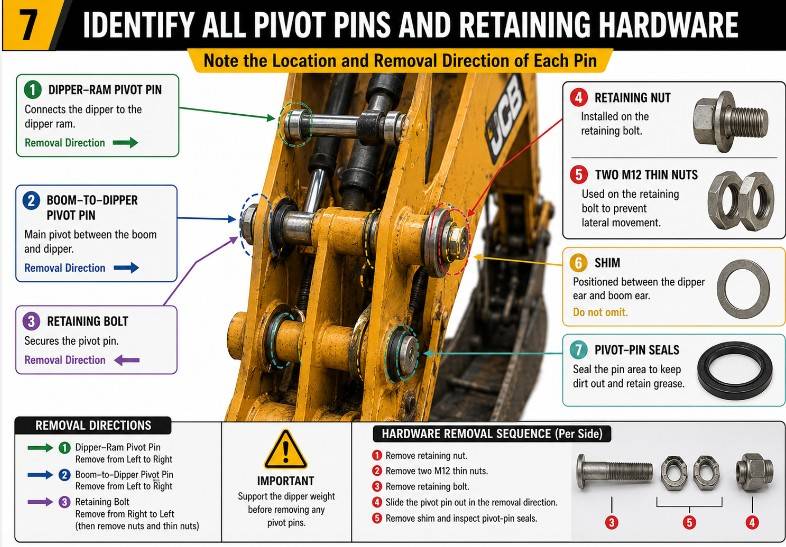
Remove the retaining nut, bolt and dipper-ram pivot pin.
Keep all reusable hardware clean and inspect it for wear, corrosion or damage.
9. Remove the Boom-to-Dipper Pivot Pin
Remove the two thin retaining nuts, retaining bolt and boom-to-dipper pivot pin.
The retaining arrangement must use two thin nuts. This allows the retaining bolt to be secured without applying unwanted lateral force to the pivot pin.
Do not substitute a single standard nut unless the model-specific JCB service documentation specifies otherwise.
10. Lift the Dipper Away
Check that:
- All hoses are disconnected.
- All cables and attachments are clear.
- Both pivot pins have been removed.
- The dipper is fully supported by the lifting equipment.
Slowly lift the dipper away from the boom.
Move the assembly to a suitable support stand before removing the sling.
JCB Dipper Installation Procedure
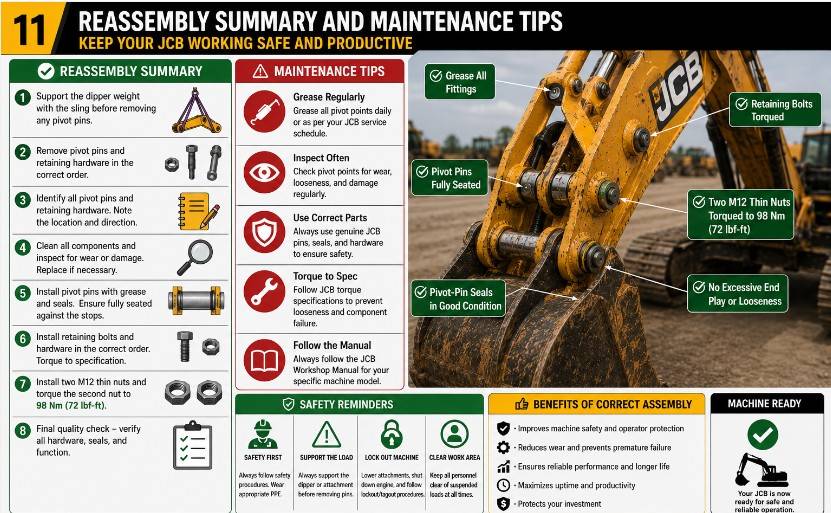
Installation is generally the reverse of removal, but several important checks must be completed during reassembly.
Install the Boom-to-Dipper Pivot Pin
Position the dipper correctly against the boom and align the pivot-pin bores.
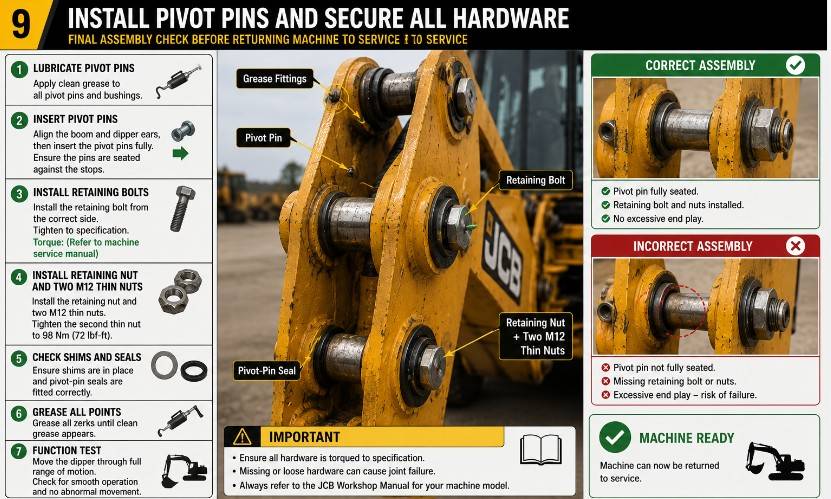
Install the required shim in its original position.
Insert the boom-to-dipper pivot pin and install the retaining bolt.
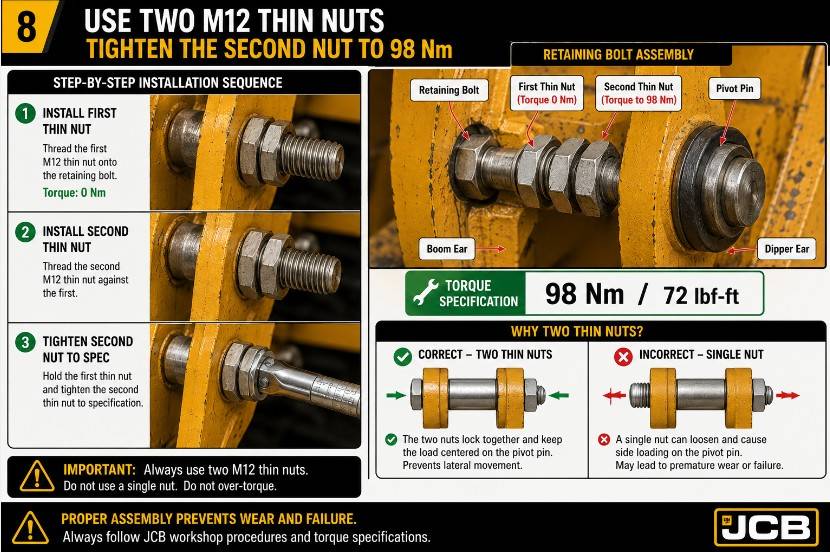
The retaining bolt must be secured with two M12 thin nuts:
- Install the first thin nut with zero tightening torque.
- Install the second thin nut.
- Tighten the second nut to 98 Nm, equivalent to 72 lbf-ft.
This two-nut arrangement secures the retaining bolt without inducing lateral tension in the pivot pin.
Reinstall the Dipper-Ram Pivot Pin
Align the dipper ram with the mounting point.
Install the pivot pin, retaining bolt and nut according to the applicable JCB workshop specifications.
Inspect and Replace Pivot-Pin Seals
Inspect all pivot-pin seals during installation.
Replace any seal that is:
- Cut
- Hardened
- Deformed
- Contaminated
- Excessively worn
Damaged seals can allow dirt and moisture to enter the joint, accelerating pin and bush wear.
Reconnect the Hydraulic Hoses
Remove the protective caps and plugs only immediately before reconnecting each hose.
Use the identification labels to confirm that every hydraulic hose is connected to the correct port.
Make sure all connections are clean and tightened to the model-specific specification.
Checking for Hydraulic Leaks
After completing installation:
- Reconnect the battery.
- Start the engine at low idle.
- Slowly operate the backhoe controls.
- Check that the dipper and bucket ram move normally.
- Inspect all hydraulic connections for leaks.
- Check the hydraulic-fluid level and top up if necessary.
- Lubricate the pivot points according to the machine maintenance schedule.
Never use your fingers to check for hydraulic leaks.
A fine jet of high-pressure hydraulic fluid can penetrate the skin. Use a piece of cardboard or another suitable leak-detection method.
If hydraulic fluid penetrates the skin, seek emergency medical treatment immediately.
Final Inspection Checklist
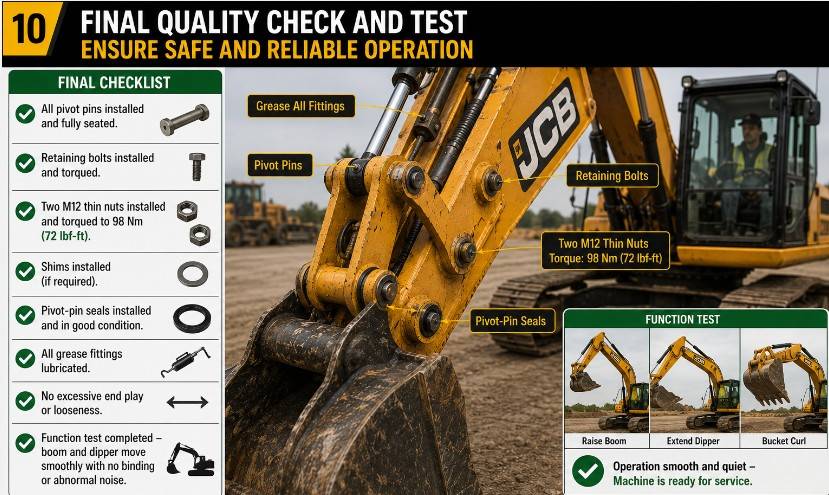
Before returning the machine to service, verify that:
- Both pivot pins are fully installed.
- All retaining bolts and nuts are secure.
- The two M12 thin nuts are correctly fitted.
- The second thin nut is tightened to 98 Nm.
- The required shim is installed.
- Hydraulic hoses are connected to the correct ports.
- No hoses are twisted, stretched or trapped.
- Pivot-pin seals are in good condition.
- Hydraulic-fluid level is correct.
- All pivot points have been lubricated.
- No hydraulic leaks are present.
- The dipper moves smoothly through its full operating range.
Using JCB ServiceMaster for Diagnosis and Repair
Mechanical repairs should be completed using the correct workshop documentation for the machine model and serial number.
The JCB Electronic Service Tool Diagnostic Kit can assist technicians with electronic diagnosis before and after the dipper repair. Depending on the machine and available software functions, technicians may use JCB ServiceMaster to:
- Read and clear diagnostic trouble codes
- View live machine data
- Check hydraulic and electronic control inputs
- Monitor sensor and switch status
- Perform supported service functions
- Confirm control-system operation after repair
A diagnostic tool does not replace proper mechanical inspection, hydraulic safety procedures or model-specific workshop information.
JCB ServiceMaster 4 V26.7.1 Diagnostic Software
The July 2026 JCB ServiceMaster 4 V26.7.1 diagnostic software package with SW files is designed for supported JCB construction and agricultural equipment.
https://www.obdii.shop/goods-439-JCB-ServiceMaster-4-Diagnostic-Software.html
The package may be used with a compatible JCB diagnostic interface for:
- Electronic control-module diagnosis
- Fault-code reading and clearing
- Live-data monitoring
- Machine-system troubleshooting
- Supported parameter and service functions
- Technician-guided diagnostic procedures
Software coverage and functions vary by machine model, production year, control module and installed equipment. Compatibility should be confirmed before ordering or installing the software.
Need JCB Diagnostic Support?
OBDII.SHOP supplies JCB diagnostic tools, software packages and technical support for professional technicians and equipment owners.
For compatibility assistance, provide:
- JCB machine model
- Serial number
- Production year
- Engine model
- Current diagnostic software version
- Clear photos of the diagnostic connector
- Description or screenshot of the fault
Contact: sales@obdii.shop
Always use the correct JCB workshop manual and follow applicable workplace safety procedures when removing or installing heavy backhoe components.

Leave a Reply