
The Autel Maxisys MS908S PRO Diagnostic Tool, based on the revolutionary Android multitasking operating system, utilizes the powerful Cortex A7+A15 six-core processor, and equips with 9.7-inch LED capacitive touch screen.
Check Top 3 Reasons to Get Maxisys MS908S Pro :
1. Software Version: Every Car Model Software Has a Different Version.
2. Wi-Fi Technology: The VCI connects wirelessly to the main unit with Long-Range Class 1 Bluetooth
3. Free Shipping by DHL All Around the World, 3-5 Days Delivery
This article mainly guides the customers to know more detailed information about the control units and ECU information, hoping to provide some help when facing these two facets of usage problems.
1.Control Units
This option allows you to manually locate a required control system for testing through a series of choices. Simply follow the menu driven procedure, and make proper selection each time; the program will guide you to the diagnostic function menu after a few choices you’ve made.
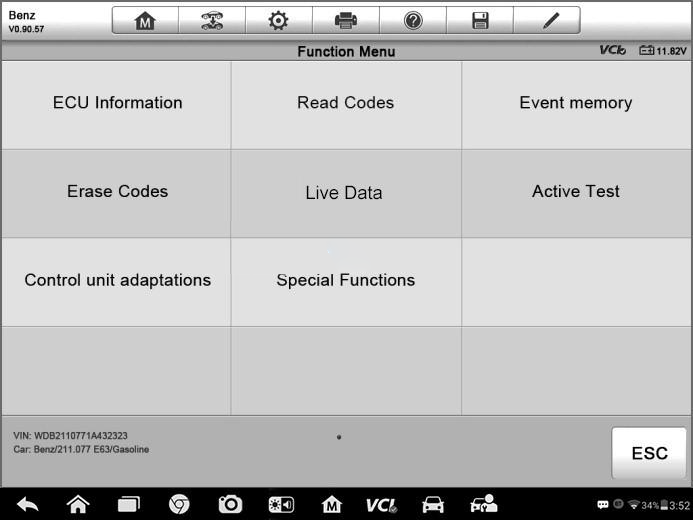
The Function Menu options vary slightly for different vehicles. The function menu may include:
<1>ECU Information – provides the retrieved ECU information in detail. Selecting opens an information screen.
<2>Read Codes – displays detailed information of DTC records retrieved from the vehicle control module.
<3>Erase Codes – erases DTC records and other data from the ECM.
<4>Live Data – retrieves and displays live data and parameters from the vehicle’s ECU.
<5>Active Test – provides specific subsystem and component tests. This selection may appear as Actuators, Actuator Test, or Function Tests and the tests options vary depending on the manufacturer and model.
<6>Special Functions – provides component adaptation or variant coding functions for custom configurations, and also allows you to reprogram adaptive values for certain components after making repairs. Depending on the test vehicle, this selection may sometimes appear as Control Unit Adaptations, Variant Coding, Configuration or something similar.
Message to be noted:
With the diagnostic toolbar on top of the screen throughout the whole diagnostic procedures, you are allowed to make various controls of the diagnostic information at any time, such as printing and saving the displayed data, get help information, or
perform data logging.
How to perform a diagnostic function?
<1>Establish communication with the test vehicle via the VCI device.
<2>Identify the test vehicle by selecting from the menu options.
<3>Select the Diagnosis section.
<4>Locate the required system for testing by Auto Scan or through menu driven
selections in Control Units.
<5>Select the desired test from the Function Menu.
2.ECU Information
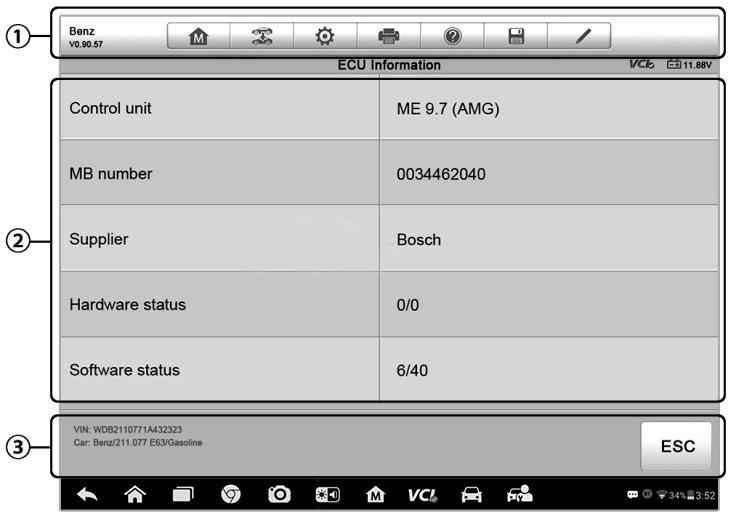
This function retrieves and displays the specific information for the tested control unit, including unit type, version numbers and other specifications. The sample ECU Information screen displays as below:
<1>Diagnostics Toolbar Buttons
<2>Main Section–the left column displays the item names; the right column displays
the specifications or descriptions.
<3>Functional Button–in this case, only a Back (or ESC) button is available; tap it to
exit after viewing.
Leave a Reply