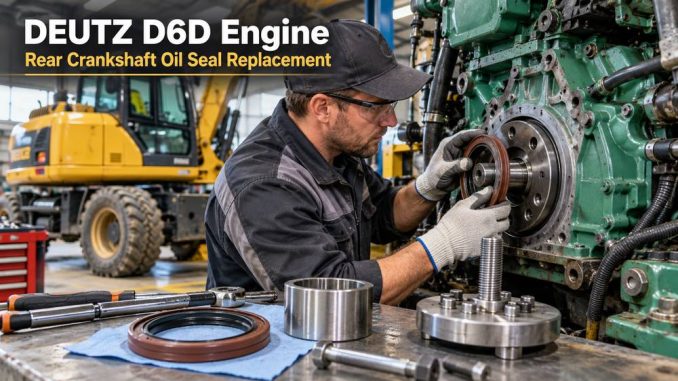
A leaking rear crankshaft oil seal is a common source of engine oil leakage around the flywheel housing. On a DEUTZ D6D diesel engine, a damaged oil seal or worn crankshaft sealing surface can allow engine oil to escape from the rear of the engine.
Replacing the seal requires correct machine positioning, suitable installation tools, careful inspection of the wear sleeve, and proper reassembly.
This guide explains how to prepare for DEUTZ D6D rear crankshaft oil seal replacement, identify potential leak sources, inspect the sealing components, and verify the repair.
Important: The procedure below is a general repair workflow based on the supplied service information. Confirm exact disassembly sequences, seal installation depth, lubrication requirements, and tightening specifications against the service manual for the specific engine and machine.
1. Tools and Parts Required
Before starting the repair, prepare the following equipment.
Tool or Replacement Part Part Number
Crankshaft oil seal removal tool As specified
Crankshaft oil seal installation tool As specified
Rear crankshaft oil seal 20459168
Crankshaft wear sleeve 20740023
Silicone grease 1161325
Cleaning materials As required
Appropriate lifting and support equipment As required
Note: The listed part numbers come from the supplied repair procedure. Confirm their applicability using the engine serial number and correct parts catalog before ordering.
Using the correct installation tool is particularly important. An incorrectly positioned rear crankshaft seal may leak even when the replacement seal is new.
2. Position the Machine for Safe Access
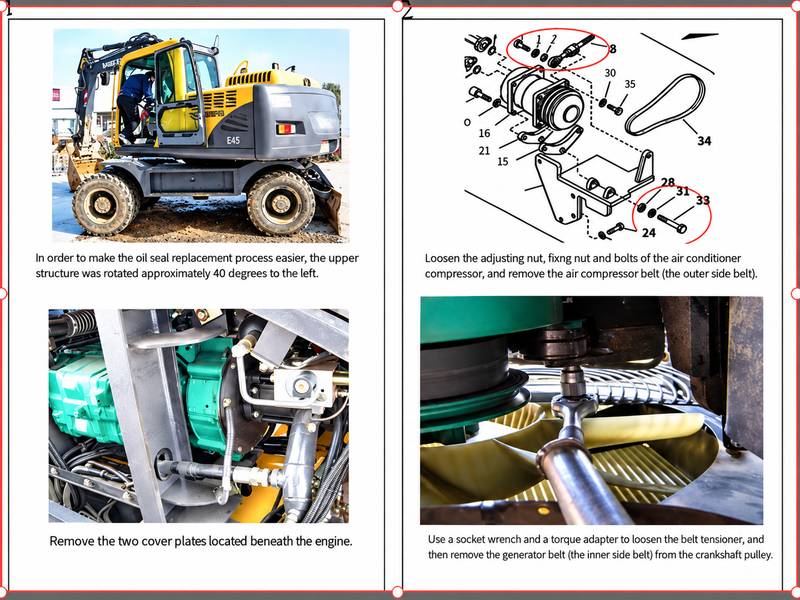
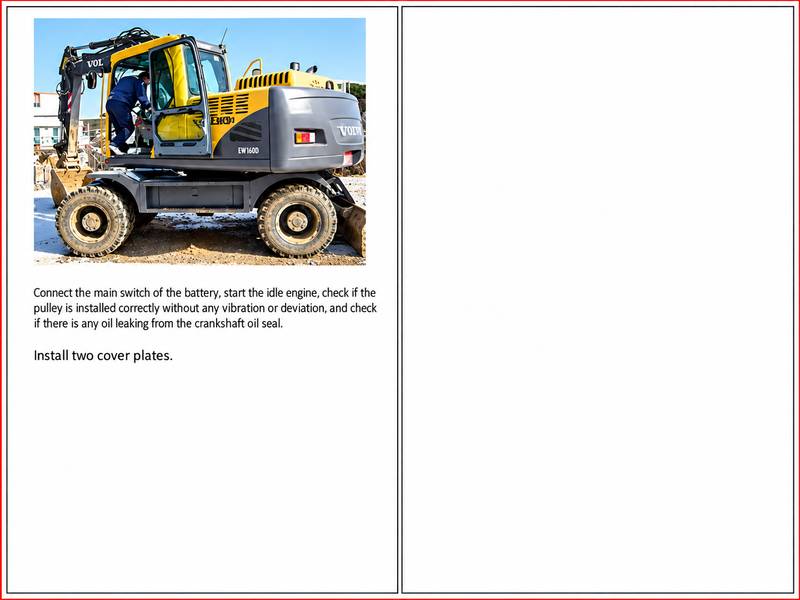
Before removing any components, position the machine to provide sufficient working space beneath the engine.
For the machine configuration described in this procedure:
- Park on firm, level ground.
- Lower the attachment to a safe resting position.
- Rotate the upper structure about 40 degrees to the left of the machine’s front.
- Secure the machine against unexpected movement.
- Confirm you can safely access the lower engine cover plate.
This positioning provides working clearance to remove the protective cover beneath the engine.
The 40-degree positioning instruction is machine-specific and should not be applied automatically to every DEUTZ D6D installation.
3. Turn Off the Battery Master Switch
After positioning the machine, shut down the engine and isolate its electrical system.
Turn off the battery master switch to reduce the risk of accidental engine starting during maintenance.
Before proceeding:
- Remove the ignition key.
- Follow the machine’s lockout/tagout procedure.
- Allow hot components to cool.
- Release stored hydraulic pressure according to the equipment manufacturer’s instructions.
- Verify that the engine cannot start unexpectedly.
Never work around rotating components or unsupported machine assemblies.
4. Arrange for Two Technicians
The original DEUTZ D6D replacement procedure requires two people.
This matters because access to the rear crankshaft area may require removing large or heavy components.
One technician can support and position components while the other performs the required disassembly or installation.
Use suitable lifting equipment whenever necessary. A second technician is not a substitute for proper mechanical support.
5. Access the Rear Crankshaft Oil Seal
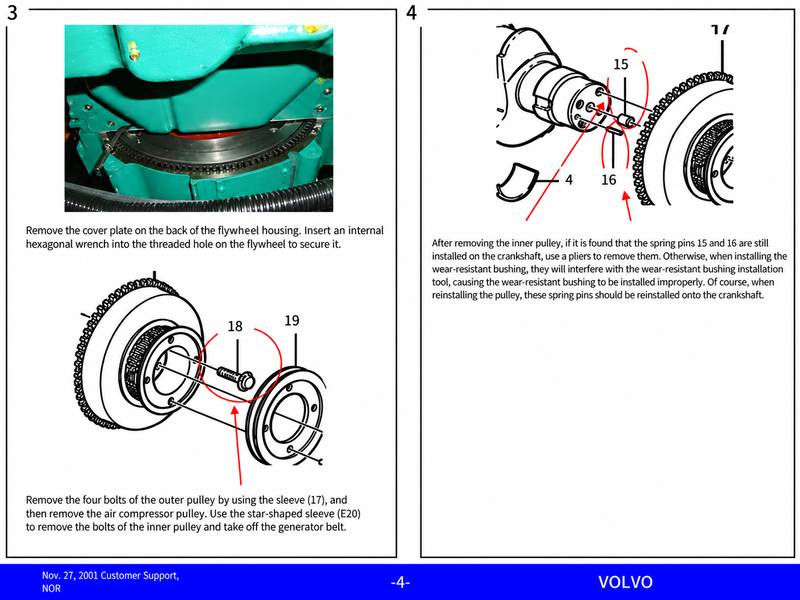
Remove the lower engine cover plate and any additional components identified in the applicable service manual.
Depending on the machine configuration, accessing the rear crankshaft seal may require removing drivetrain- or flywheel-related components.
Before removing the old seal:
- Clean the surrounding area.
- Inspect the flywheel housing for accumulated oil.
- Identify the likely source of the leak.
- Protect exposed engine openings against dirt and debris.
- Follow the manufacturer’s disassembly sequence.
Important: Oil around the flywheel housing does not necessarily indicate a failed rear crankshaft seal. Oil may travel downward from another engine component.
Confirm the leak source before undertaking extensive disassembly.
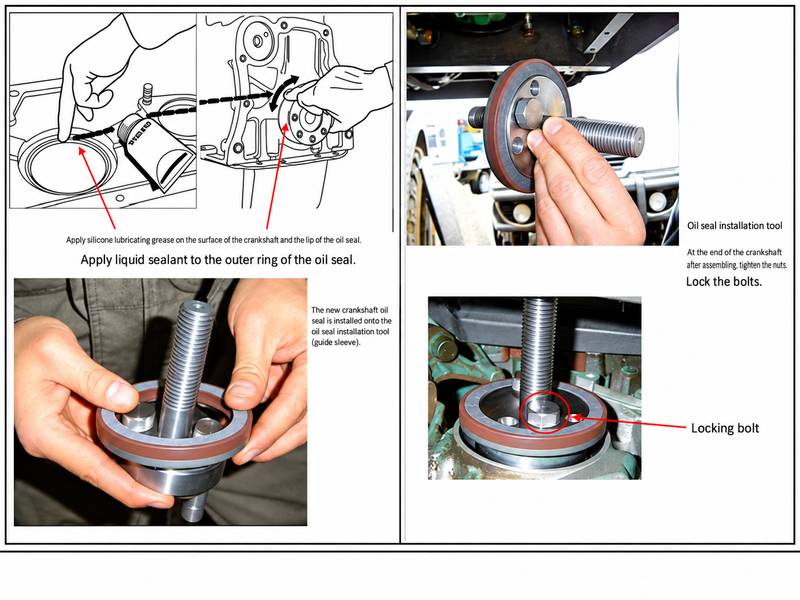
6. Remove the Damaged Rear Crankshaft Oil Seal
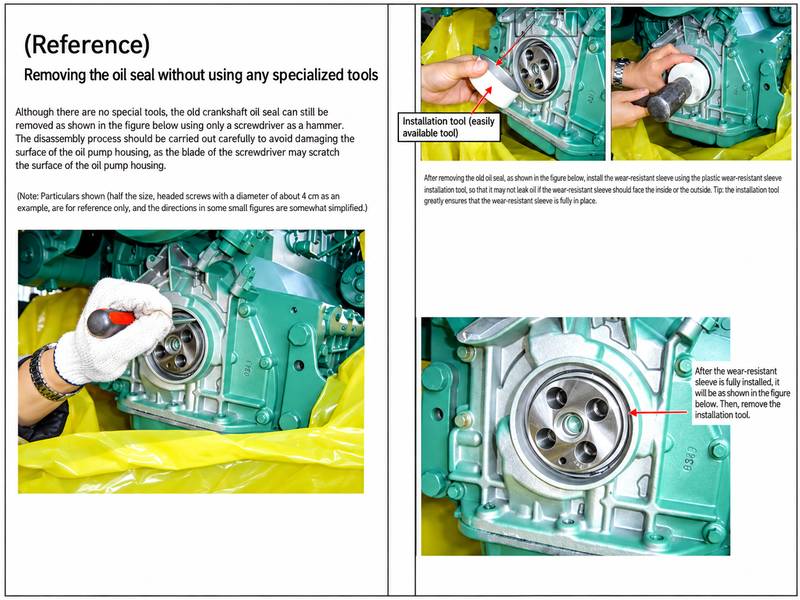
Once the rear crankshaft seal is accessible, use the specified removal tool.
Avoid prying directly against the crankshaft sealing surface.
Improper removal may scratch or damage the crankshaft, creating a new leak path.
After removing the old seal, inspect it for:
- Cracked or hardened sealing lips
- Uneven wear
- Deformation
- Heat damage
- Damaged sealing edges
- Evidence of incorrect previous installation
Also check the seal housing for damage or contamination.
Replace a damaged seal rather than reuse it.
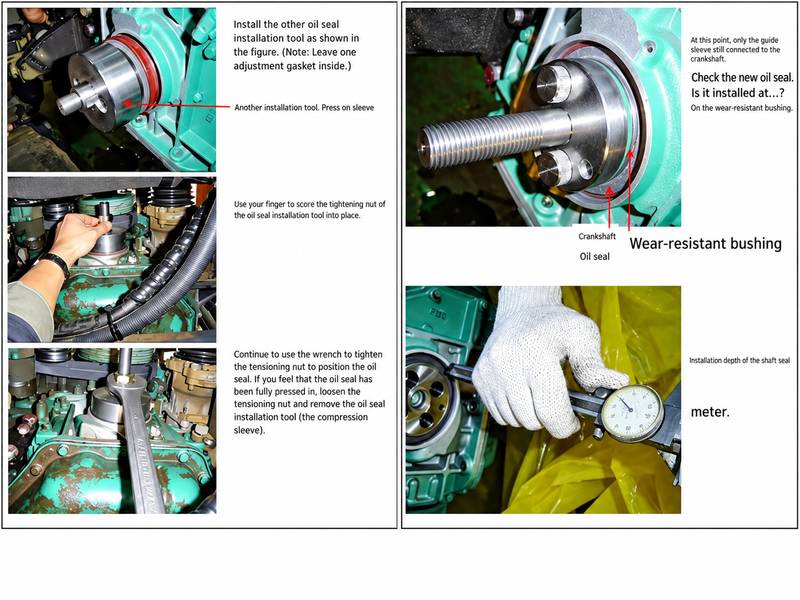
7. Inspect the Crankshaft Wear Sleeve
The crankshaft sealing surface must be in suitable condition before installing a replacement oil seal.
Inspect the wear sleeve and the area where the seal contacts the crankshaft.
Look for:
- Excessive grooves
- Surface scratches
- Corrosion
- Burrs
- Uneven wear
- Damage caused by previous seal removal
The supplied replacement procedure identifies wear sleeve P/N 20740023.
If the wear sleeve is damaged or outside the manufacturer’s specifications, replace it using the approved procedure.
A new rear crankshaft oil seal may still leak if the mating surface is excessively worn.
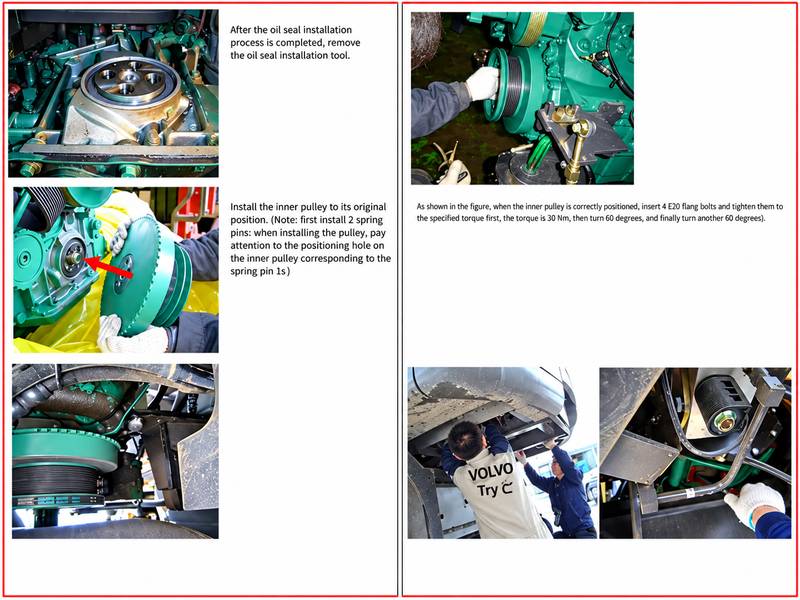
8. Install the New Rear Crankshaft Oil Seal
Prepare the replacement seal, identified in the supplied procedure as P/N 20459168.
Before installation:
- Verify that the replacement part matches the engine.
- Inspect the new seal for shipping or handling damage.
- Clean the installation area.
- Verify the wear sleeve condition.
- Confirm the correct installation direction and depth.
- Follow the manufacturer’s instructions for surface preparation and lubrication.
The supplied parts list includes silicone grease P/N 1161325. Apply it only to the surfaces specified in the relevant repair instructions.
Some crankshaft seals require dry installation, while others require specific lubrication. Incorrect lubrication can cause premature failure.
Use the recommended seal installation tool to position the seal evenly.
Do not strike the seal directly with a hammer or force it into the housing at an angle.
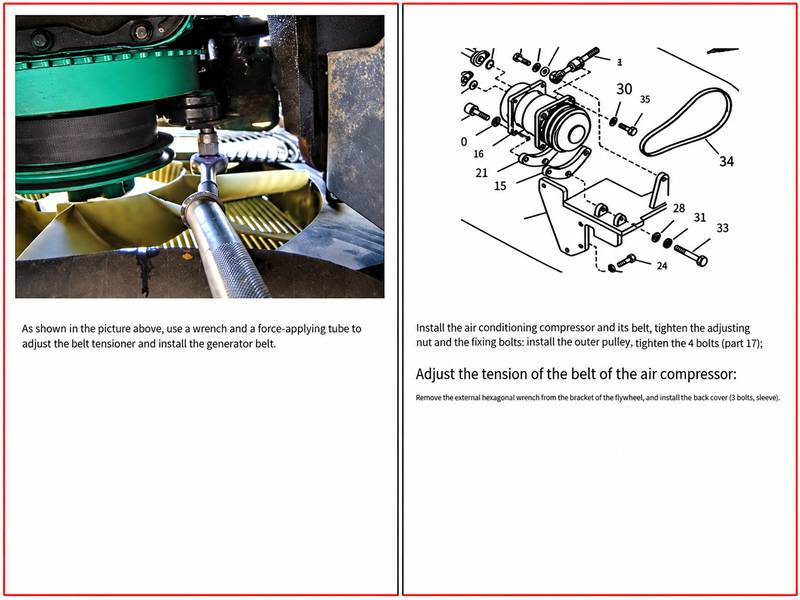
9. Reassemble the Engine and Check for Oil Leaks
After installing the new seal, reassemble the components in the reverse order specified by the machine’s service manual.
Use the correct tightening sequence and torque specifications for all removed components.
Before starting the engine:
- Verify that all removed components are properly installed.
- Check that the lower cover and protective guards are secure.
- Inspect the surrounding area for tools or loose parts.
- Confirm the engine oil level.
- Restore the electrical system.
- Start the engine and observe the repaired area for leakage.
If the repaired area is not visible during engine operation, use an appropriate inspection procedure after safely shutting down the machine.
Check again after the engine reaches normal operating temperature.
10. Why Does a DEUTZ D6D Rear Crankshaft Oil Seal Leak?
Understanding the cause of seal failure can help prevent repeated repairs.
Possible Cause What to Check Recommended Action
Worn sealing lip Cracks, hardening, uneven wear Replace the seal
Damaged wear sleeve Grooves or scratches Inspect and replace if necessary
Incorrect seal installation Uneven positioning or damaged lip Reinstall using the specified procedure
Excessive crankcase pressure Breather restriction or abnormal pressure Diagnose and correct the underlying cause
Contaminated sealing surface Dirt, debris, damaged surfaces Clean and inspect before installation
Oil leak from another component Oil tracking from above the flywheel housing Locate the actual leak source
Can Excessive Crankcase Pressure Cause a Rear Main Seal Leak?
Yes. Excessive crankcase pressure can contribute to oil leakage through engine seals.
If the replacement seal begins leaking again, inspect the crankcase ventilation system and evaluate crankcase pressure according to the manufacturer’s specifications.
Repeated seal replacement without correcting an underlying pressure problem may not resolve the leak.
11. DEUTZ Engine Diagnostics After Mechanical Repair
Replacing the rear crankshaft oil seal is primarily a mechanical repair. It normally does not require ECU programming.
However, if the engine also experiences warning lights, abnormal performance, starting difficulties, or electronic fault codes, an engine diagnostic tool can help technicians investigate those separate problems.
For supported DEUTZ electronically controlled engines, the DEUTZ DeCOM diagnostic interface provides communication with compatible engine management controllers.
Recommended DEUTZ Diagnostic Tool
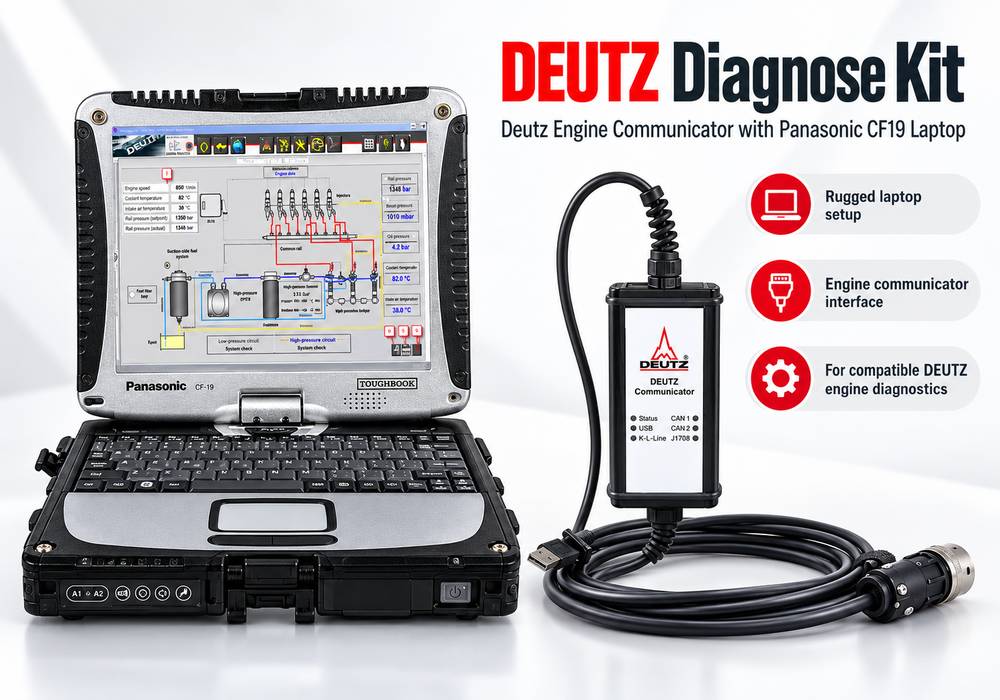
DEUTZ Diagnose Kit for DEUTZ Engine Communicator – DeCOM Diagnostic Tool
The DEUTZ Diagnose Kit available from OBDII.SHOP is intended for diagnostic work on supported DEUTZ electronic engine control systems.
According to the product specifications, the kit supports communication with several DEUTZ EMR controller generations, including:
- EMR2
- EMR3
- EMR4
Supported controller families include selected EDC16, EDC7, and EDC17 systems.
Depending on the controller and software configuration, the diagnostic system may support:
- Reading and clearing supported diagnostic fault codes
- Monitoring available engine operating data
- Identifying engine controller information
- Investigating electronic engine management faults
- Performing supported service functions
Certain functions require the appropriate SerDia software version and authorization dongle.
DEUTZ Diagnose Kit Configuration Options
OBDII.SHOP lists several kit configurations, including:
ConfigurationDescription
DEUTZ Diagnose Kit with Software Diagnostic interface with software supplied on an SSD
DEUTZ Diagnose Kit with Panasonic CF19 Diagnostic kit with a laptop configured with DEUTZ software
DEUTZ Diagnose Kit with SerDia 4.0 Dongle Diagnostic interface, compatible dongle option, and remote software installation
DEUTZ Diagnose Kit with CF19 and SerDia 4.0 Dongle Kit with configured laptop and dongle option
Before ordering: Confirm your DEUTZ engine model, EMR controller generation, required diagnostic functions, and software configuration.
View the DEUTZ Diagnose Kit and Available Configurations at OBDII.SHOP
Note: The DEUTZ diagnostic kit does not physically replace the crankshaft oil seal. It is intended for compatible electronic engine diagnostics and troubleshooting.
12. Frequently Asked Questions
What are the symptoms of a leaking DEUTZ D6D rear crankshaft oil seal?
Common symptoms include engine oil collecting around the rear of the engine, oil traces near the flywheel housing, and recurring oil leakage after cleaning.
Other nearby components may cause similar symptoms, so confirm the leak source before replacing the seal.
What is the DEUTZ D6D rear crankshaft oil seal part number?
The supplied repair procedure identifies 20459168 as the replacement oil seal.
Verify the part number against the specific engine serial number before ordering.
Should the crankshaft wear sleeve be replaced with the oil seal?
Not necessarily.
Inspect the wear sleeve for damage or excessive wear, and replace it when required by the manufacturer’s specifications.
Can a rear crankshaft oil seal be installed without a special tool?
A dedicated installation tool is recommended because it helps position the seal evenly and at the correct depth.
Improvised installation methods increase the risk of seal damage.
Does the DEUTZ D6D engine require diagnostic programming after replacing the rear crankshaft seal?
A routine mechanical seal replacement generally does not require ECU programming.
Diagnostic testing may still be useful if the engine has separate electronic faults or abnormal operating conditions.
Which DEUTZ diagnostic tool supports EMR controllers?
The DEUTZ Diagnose Kit with DeCOM Diagnostic Interface is listed for use with supported EMR2, EMR3, and EMR4 controllers.
Always verify compatibility with the engine ECU, software version, and required functions.
Conclusion
Replacing the DEUTZ D6D rear crankshaft oil seal requires careful preparation, safe machine positioning, correct tools, and inspection of the crankshaft sealing surface.
The most important steps are confirming the source of the oil leak, checking the wear sleeve, installing the replacement seal correctly, and verifying that the repaired area remains leak-free.
For technicians working with electronically controlled DEUTZ engines, the DEUTZ DeCOM Diagnose Kit from OBDII.SHOP can also support compatible engine diagnostics and fault investigation.
Leave a Reply