Modern vehicles depend on electronic control units to manage the engine, transmission, immobilizer, emissions system, body electronics, and many other functions. When an ECU fails or must be replaced, the new or used module may need to be programmed, cloned, coded, or adapted before the vehicle will operate correctly.
This guide explains the differences between these procedures, the tools required, and a practical ECU programming workflow for professional technicians, repair shops, automotive locksmiths, and experienced vehicle owners.
Important: ECU programming can permanently damage a control module if the wrong file, protocol, wiring diagram, or power supply is used. Always confirm vehicle and ECU compatibility before reading or writing data.
What Is ECU Programming?
ECU programming is the process of installing or updating software and calibration data inside an electronic control unit.
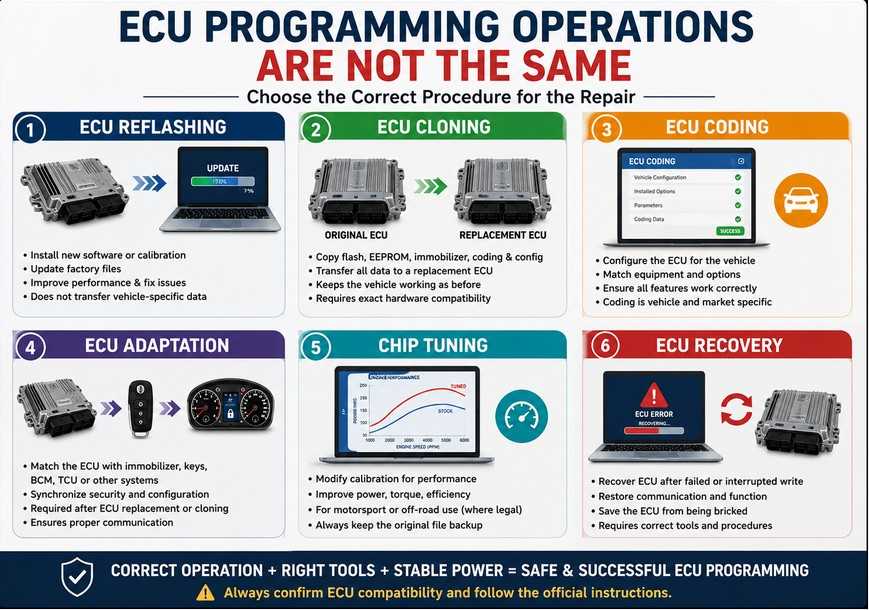
Depending on the specific repair, the required operation may include:
- ECU reflashing: Installing manufacturer software or a calibration update.
- ECU cloning: Copying flash, EEPROM, immobilizer, coding, and configuration data from the original ECU to a compatible replacement ECU.
- ECU coding: Configuring a control unit according to the equipment installed in the vehicle.
- ECU adaptation: Matching a replacement ECU with the immobilizer, body control module, transmission, keys, or other vehicle systems.
- Chip tuning: Modifying calibration data to improve performance or drivability.
- ECU recovery: Restoring a control module after an interrupted or unsuccessful programming operation.
These terms are not interchangeable. For example, successfully writing an engine calibration does not necessarily complete immobilizer synchronization or vehicle coding.
Why Might an ECU Need Programming?
ECU programming may be required when:
- The original ECU has an internal electronic fault.
- Water intrusion or corrosion has damaged the control unit.
- The ECU has been damaged by incorrect voltage or reverse polarity.
- A software update is required to correct a known operating issue.
- A new or used replacement ECU has been installed.
- The original ECU data must be transferred to another compatible unit.
- A previous programming attempt was interrupted.
- The vehicle requires ECU, TCU, BCM, or immobilizer adaptation.
- A supported calibration is being modified for motorsport or lawful off-road use.
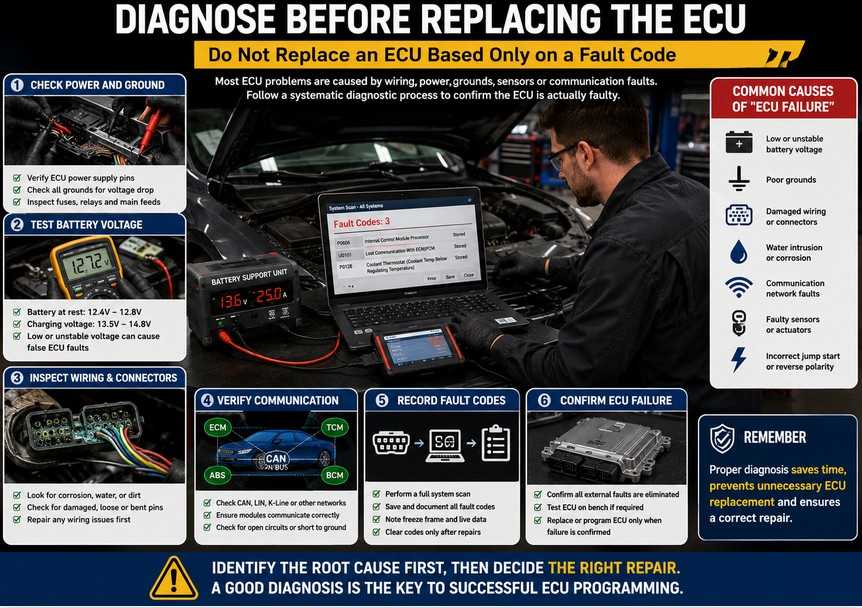
Do not replace an ECU based only on a fault code. Wiring faults, poor grounds, low battery voltage, damaged sensors, network communication problems, or incorrect previous repairs can produce symptoms that appear to be ECU-related.
Essential ECU Programming Tools
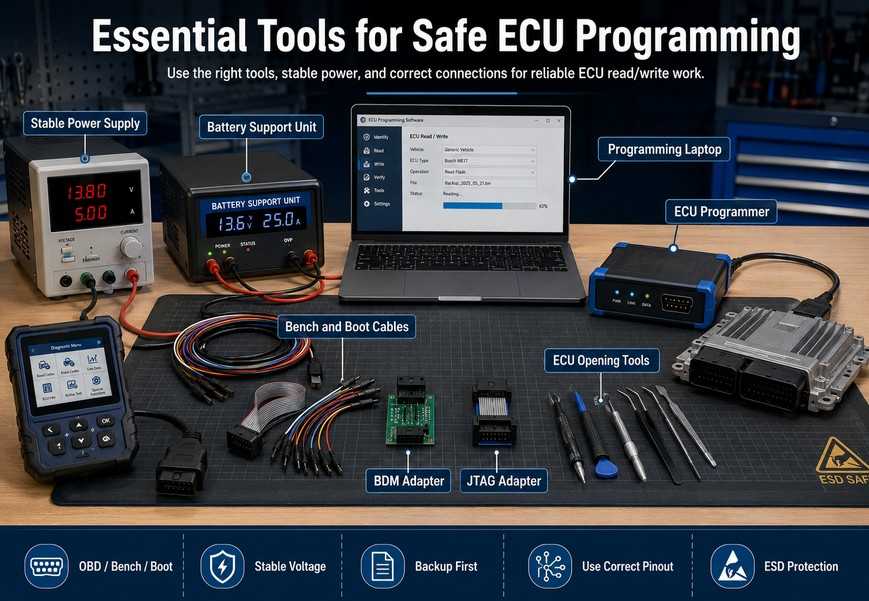
A professional ECU programming setup may require more than one device.
ECU Programmer
An ECU programmer communicates with the control unit and reads or writes flash, EEPROM, microprocessor, or configuration data.
Depending on the ECU, communication may be performed through:
- OBD
- Bench mode
- Boot mode
- BDM
- JTAG
- Direct pinout connections
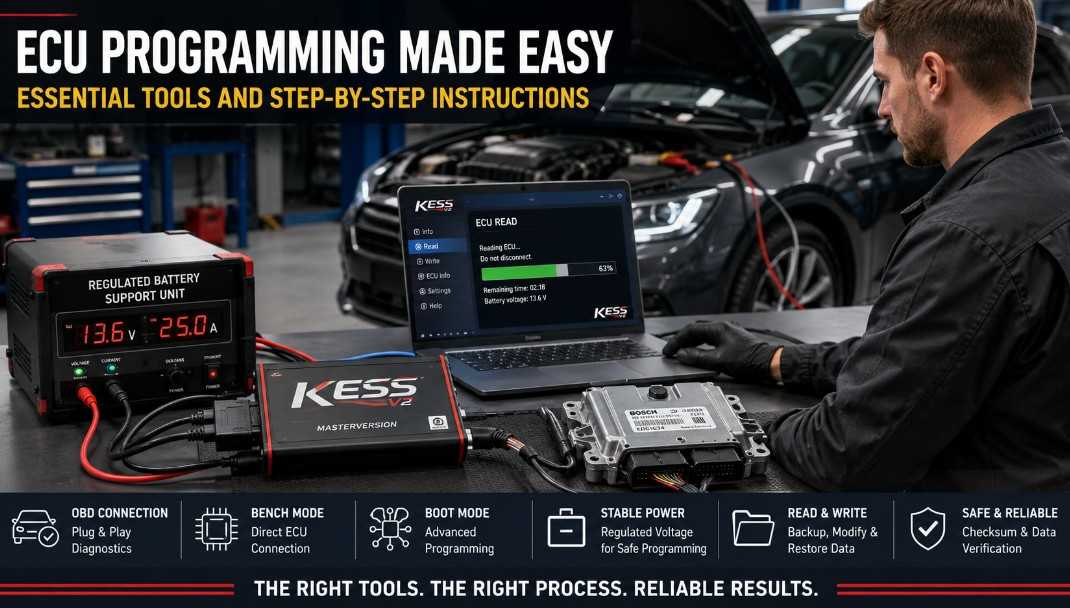
Regulated Battery Support Unit
Stable voltage is essential during programming. A normal battery charger may not provide sufficiently controlled output.
Use a regulated automotive battery support unit suitable for the vehicle and follow the voltage requirements specified by the vehicle manufacturer or programming software.
Bench Power Supply
Bench and boot operations normally require a stable power supply, ground connection, ignition feed, communication lines, and sometimes boot or reset connections.
Never guess the pinout.
ECU Opening Tools
Some boot-mode procedures require opening the ECU housing. Dedicated opening tools can reduce the risk of damaging the case, circuit board, seal, or internal components.
Diagnostic Scanner
After programming, use an appropriate diagnostic tool to:
- Perform a complete system scan.
- Clear programming-related fault codes.
- Complete coding or adaptation.
- Reset learned values when required.
- Confirm network communication.
- Verify live data and operating conditions.
Computer and Programming Software
Use a reliable computer that meets the tool manufacturer’s requirements.
Before beginning:
- Disable sleep and hibernation.
- Connect the laptop to AC power.
- Close unnecessary programs.
- Confirm that the required drivers are installed.
- Use a direct USB connection whenever possible.
- Do not allow Windows updates or security software to interrupt programming.
Recommended ECU Programming Tools
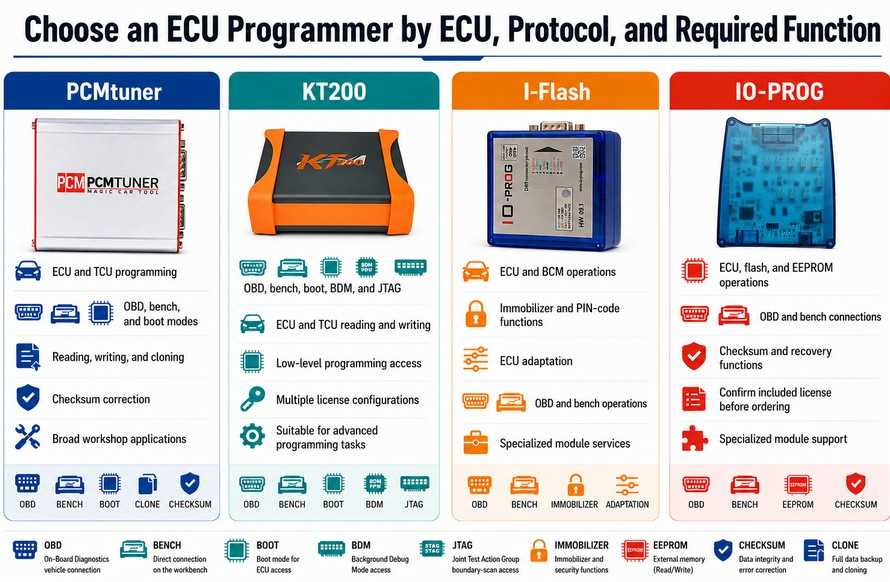
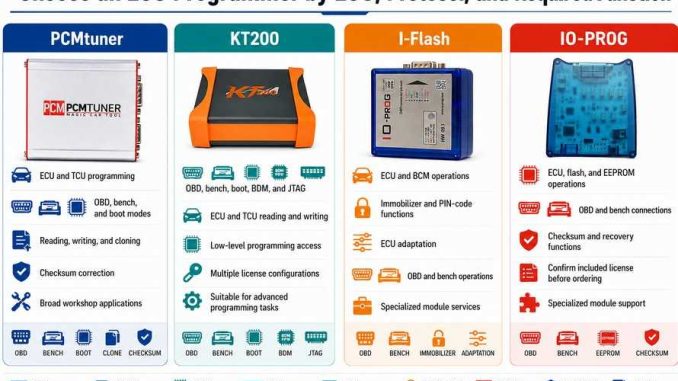
The correct programmer depends on the vehicle, ECU manufacturer, microprocessor, memory type, and required communication mode. Always check the current support list before ordering.
PCMtuner ECU Chip Tuning Tool
The PCMtuner ECU Chip Tuning Tool is designed for supported ECU and TCU reading, writing, cloning, calibration, and recovery work. Its product listing describes support for OBD, bench, and boot communication, together with read-and-write functions, checksum correction, ECU cloning, and a 67-module software package.
It may be suitable for workshops that need a general ECU and TCU programming platform for supported European, Asian, American, and commercial-vehicle applications.
KT200 ECU Programmer and Chip Tuning Tool
The KT200 ECU Programmer supports multiple operating methods, including OBD, bench, boot, BDM, and JTAG.
Available configurations may differ. The basic automotive version and the full version do not necessarily provide identical vehicle-category coverage, so buyers should confirm which hardware and license package they require.
KT200 may be suitable for workshops that need broader low-level access methods or work with ECUs and TCUs that cannot be handled through OBD alone.
I-Flash OBD Programmer
The I-Flash OBD Programmer is intended for more specialized operations involving supported ECUs, BCMs, immobilizer systems, and module adaptation.
Its product description lists OBD and bench operation along with:
- ECU and module cloning
- Immobilizer functions
- PIN-code reading
- ECU transformation and adaptation
- Parameter recalibration
Security-related functions should only be used for authorized vehicle repairs where vehicle ownership or customer authorization has been verified.
IO-PROG Programmer with DB9 Connector
The IO-PROG Programmer is a more specialized option for supported ECU, BCM, flash, and EEPROM operations.
The product page states that the supplied package is limited to the GM/Opel ECU license. It supports flash and EEPROM reading and writing through OBD or bench connections, as well as checksum handling and recovery functions for supported modules.
Buyers should not assume that every module or license mentioned on the product page is included in the basic package. Confirm the included licenses and supported modules before ordering.
Step-by-Step ECU Programming Procedure
The exact procedure varies by vehicle and ECU. The following workflow provides a safe general framework.
Step 1: Confirm That the ECU Is Actually Faulty
Before ordering a replacement ECU:
- Perform a complete vehicle scan.
- Record all diagnostic trouble codes.
- Check battery voltage and charging-system condition.
- Inspect ECU power supplies, grounds, fuses, and relays.
- Check CAN, LIN, K-line, or other communication circuits.
- Inspect connectors for water, corrosion, spread terminals, or damaged wiring.
- Review manufacturer service information and technical bulletins.
- Confirm whether the ECU can communicate on the bench.
An ECU should generally be replaced only after external power, ground, communication, sensor, and wiring faults have been eliminated.
Step 2: Identify the Original ECU Correctly
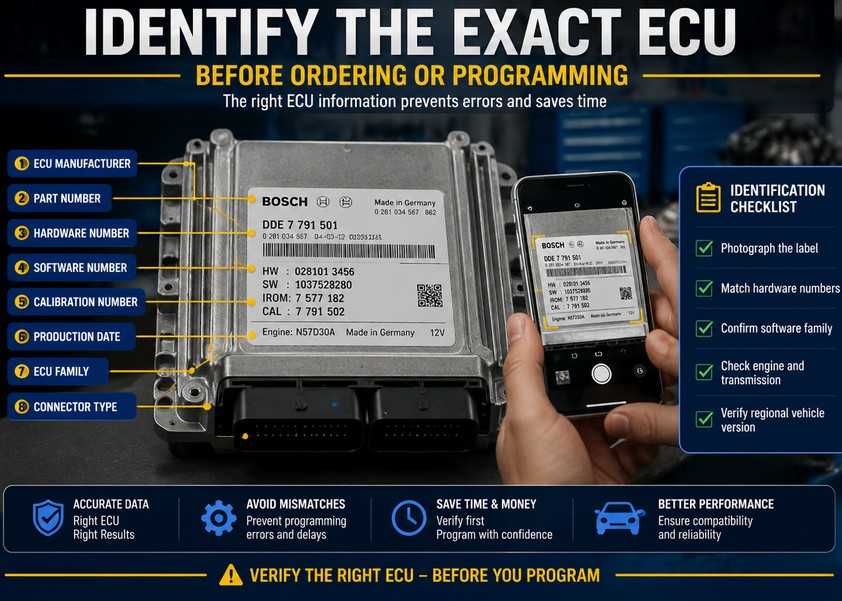
Record the information printed on the original module:
- Vehicle make and model.
- Model year
- Engine or transmission type
- ECU manufacturer
- Hardware number
- Software number
- Manufacturer part number
- Calibration number
- Microprocessor type
- Flash and EEPROM type
Take clear photographs of the ECU label and connectors before ordering a replacement.
A similar-looking module is not necessarily compatible. Hardware revisions, emissions standards, transmission types, security systems, and regional calibrations may differ even within the same vehicle model.
Step 3: Choose the Correct Programming Method
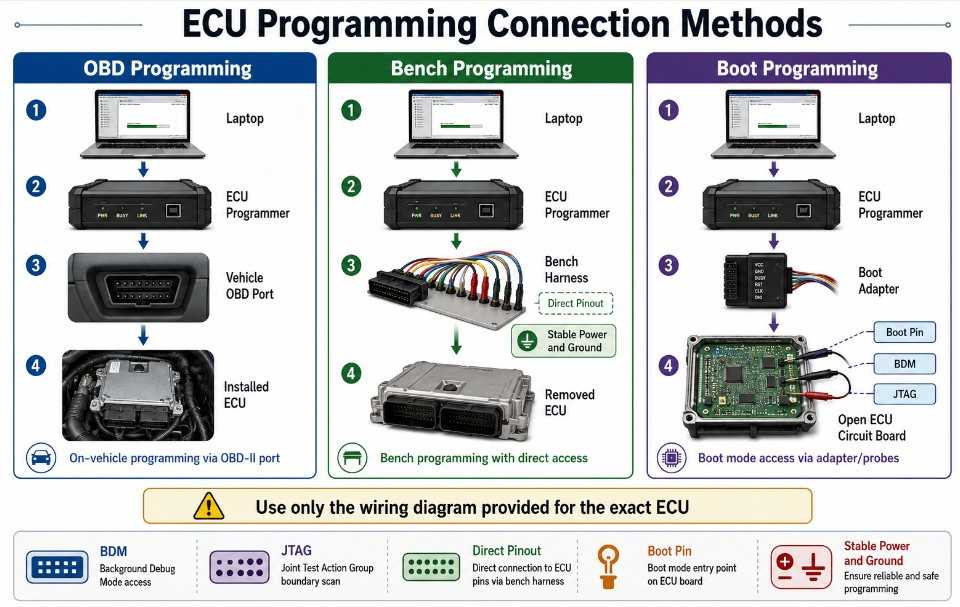
OBD Programming
OBD programming is normally the least invasive method because the ECU remains installed in the vehicle.
Use OBD mode only when:
- The exact ECU and protocol are supported.
- The module communicates correctly.
- Vehicle power and network conditions are stable.
- The software specifically instructs you to use OBD mode.
Bench Programming
Bench mode involves removing the ECU and connecting directly to its external pins.
Bench mode may be required when:
- The vehicle cannot communicate with the ECU.
- The protocol is not available through OBD.
- A full backup is required.
- The ECU is being cloned outside the vehicle.
- Vehicle network interference must be avoided.
Boot, BDM, or JTAG Programming
These methods provide lower-level access and may require opening the ECU.
They are commonly used for:
- Full flash and EEPROM backups
- ECU recovery
- Protected microprocessor access
- ECU cloning
- Repairing a module after an interrupted write
These procedures require accurate pinouts, controlled power, suitable adapters, ESD protection, and experience working with exposed circuit boards.
Step 4: Prepare the Vehicle and Work Area
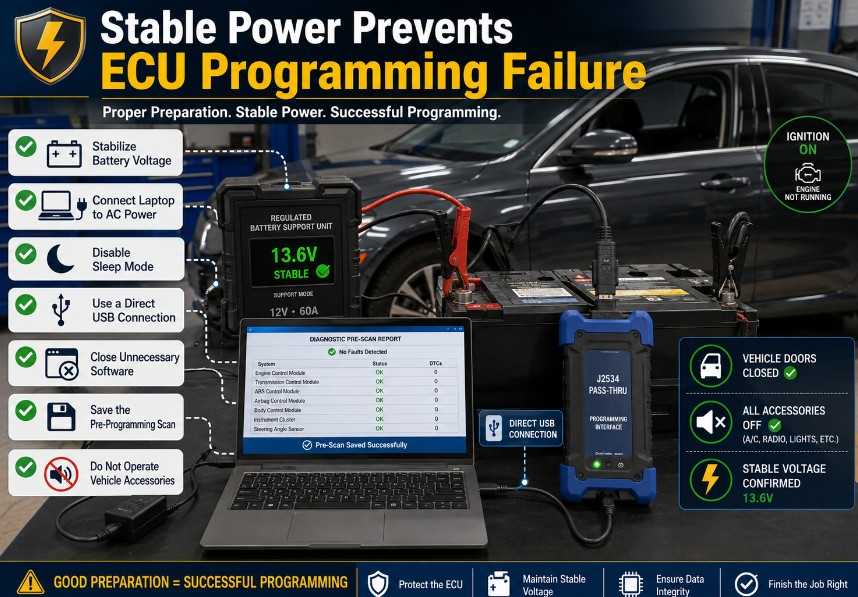
Before connecting the programmer:
- Park the vehicle in a dry, ventilated work area.
- Switch off unnecessary electrical consumers.
- Confirm that the battery is in good condition.
- Connect a regulated battery support unit.
- Connect the laptop to AC power.
- Disable automatic sleep and restart functions.
- Use a direct USB connection.
- Confirm that the ignition switch operates correctly.
- Keep keys, remote controls, and required security credentials available.
- Record the pre-programming diagnostic scan.
Do not begin programming during thunderstorms, unstable workshop power, or other conditions that could interrupt electricity or communication.
Step 5: Remove the ECU When Required
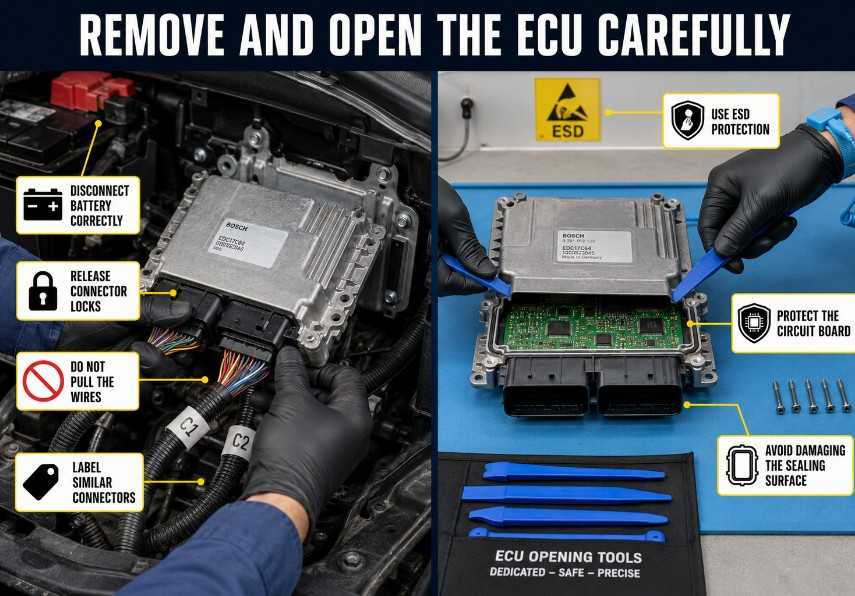
ECU removal is not required for every programming job.
When removal is necessary:
- Switch off the ignition.
- Follow the manufacturer’s battery-disconnection procedure.
- Wait for the specified period before disconnecting modules.
- Locate the ECU and remove its protective covers.
- Release the connector locks carefully.
- Do not pull connectors by their wires.
- Remove the ECU mounting hardware.
- Label connectors when multiple similar plugs are present.
- Store the ECU in an ESD-safe and moisture-free area.
If the housing must be opened, avoid forcing tools into the case. Damage to the circuit board, sealing surface, or internal components can make the ECU unusable.
Step 6: Read and Back Up the Original ECU
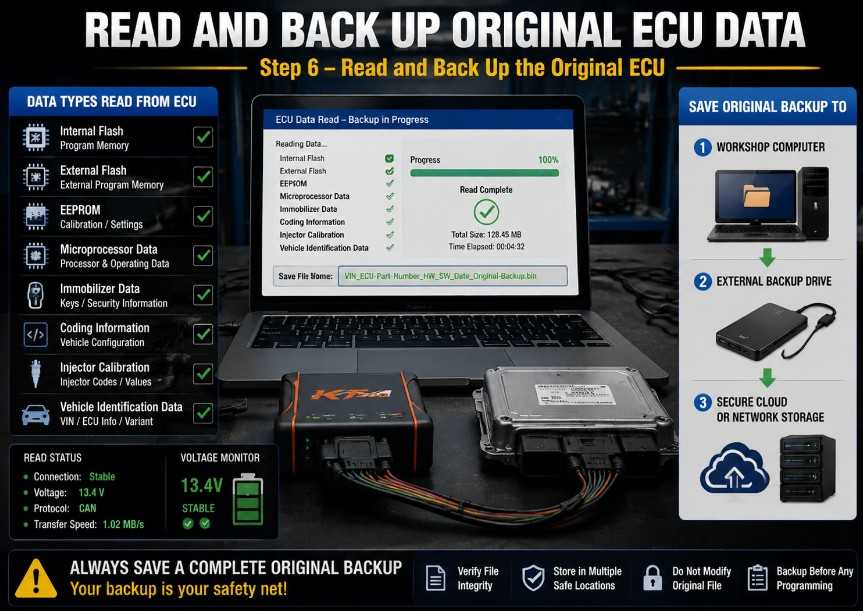
A complete backup is one of the most important parts of ECU programming.
Depending on the ECU and programmer, save:
- Internal flash
- External flash
- EEPROM
- Microprocessor data
- Immobilizer data
- Coding information
- Injector calibration data
- Vehicle identification information
- TCU or transmission adaptation data
Use a clear file-naming format, such as:
VIN_ECU-Part-Number_HW_SW_Date_Original-Backup
After reading:
- Save the file in at least two locations.
- Confirm that the file size is reasonable.
- Record the programmer, protocol, and connection method.
- Keep the original read unchanged.
- Create a separate working copy for modification.
Never overwrite the only original backup.
Step 7: Prepare the Replacement ECU
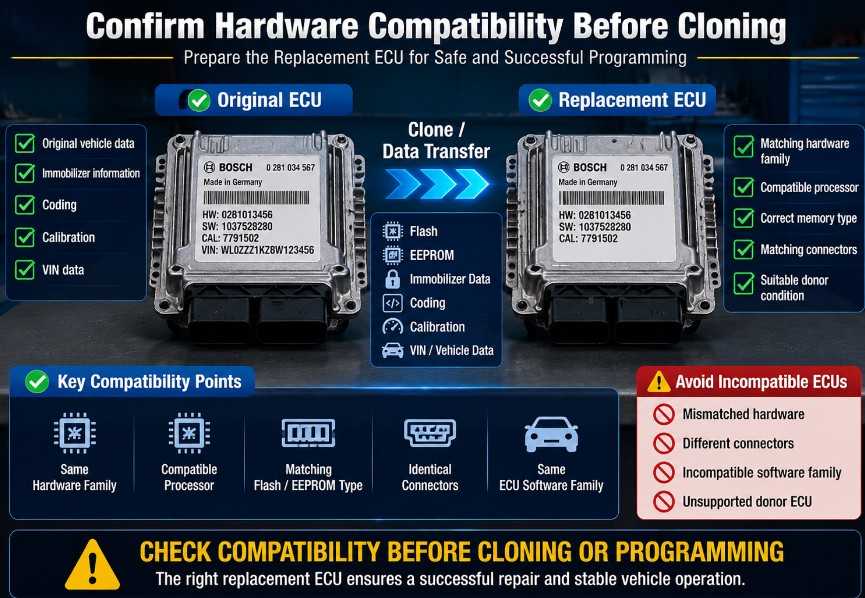
Before writing data, compare the original and replacement modules.
Confirm:
- Compatible hardware numbers
- Matching ECU family
- Compatible processor and memory
- Correct connector arrangement
- Supported donor ECU condition
- Required virginization or reset status
- Whether immobilizer adaptation is required
- Whether coding must be transferred separately
Some replacement ECUs can accept a complete clone. Others require manufacturer programming, online coding, component protection removal, immobilizer synchronization, or parameter resetting.
Step 8: Write Data to the ECU
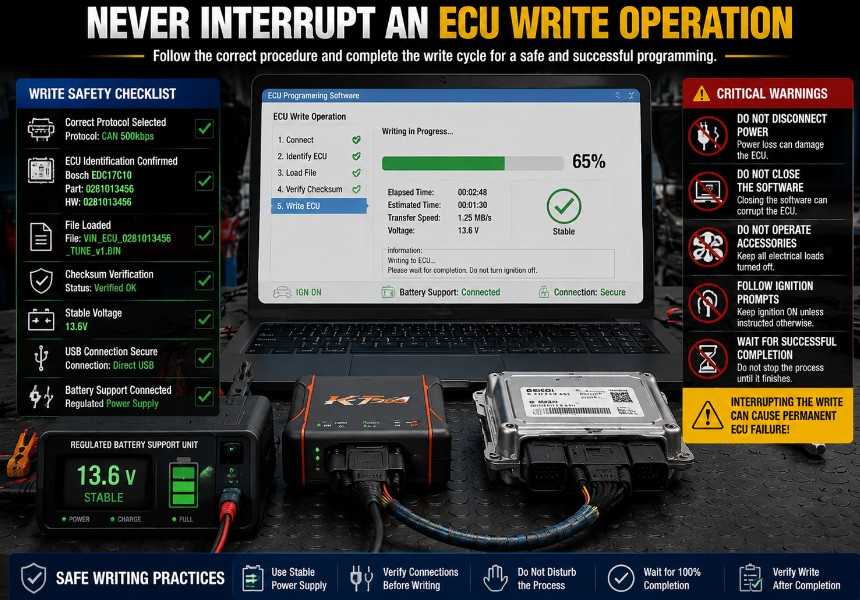
Follow the selected programmer’s instructions exactly.
A typical procedure includes:
- Select the correct vehicle, ECU, or protocol.
- Choose OBD, bench, boot, BDM, or JTAG mode.
- Confirm the wiring diagram and required voltage.
- Load the correct original, modified, or replacement file.
- Allow the software to perform identification and checksum checks.
- Start the write operation.
- Follow the ignition prompts exactly.
- Do not disconnect the USB cable, ECU cable, battery support unit, or power supply.
- Do not operate vehicle accessories.
- Wait for the software to report successful completion.
Never write a file based only on a matching file size. The file must be compatible with the ECU hardware, software family, engine, transmission, vehicle configuration, and intended market.
Step 9: Install, Code, and Adapt the ECU
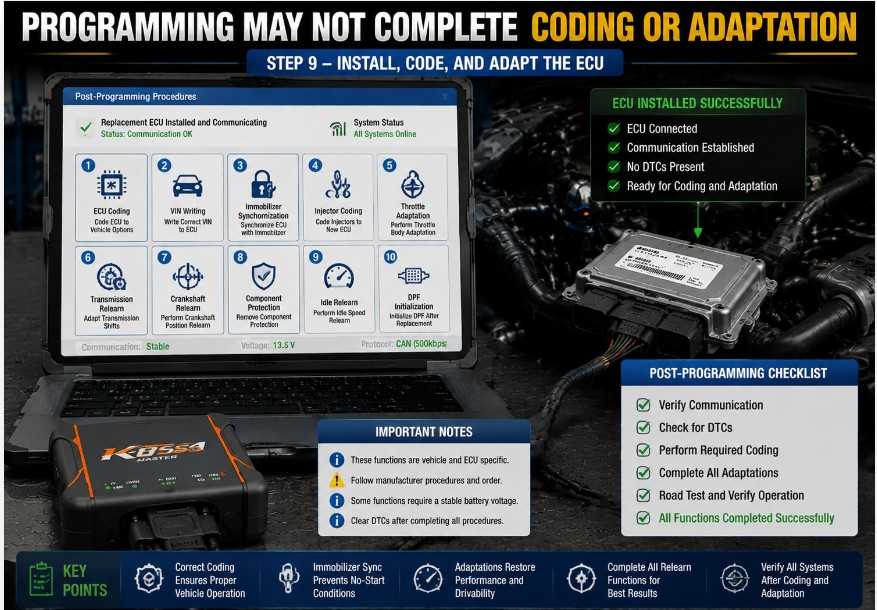
After writing:
- Switch off the power as instructed.
- Disconnect the bench or boot harness.
- Reseal an opened ECU using an appropriate automotive sealant.
- Reinstall the ECU in its original location.
- Reconnect all connectors and locking mechanisms.
- Reconnect the battery according to the manufacturer’s procedure.
- Perform ECU coding or configuration.
- Complete immobilizer or key synchronization when legally authorized.
- Carry out the required relearn or adaptation procedures.
- Clear programming-related fault codes.
Possible post-programming procedures include:
- Throttle adaptation
- Injector coding
- Crankshaft or camshaft relearn.
- Transmission adaptation reset
- Steering-angle calibration
- VIN writing
- Immobilizer synchronization
- Component protection matching
- DPF or aftertreatment initialization
- Idle relearn
The required functions vary by vehicle.
Step 10: Test the Vehicle
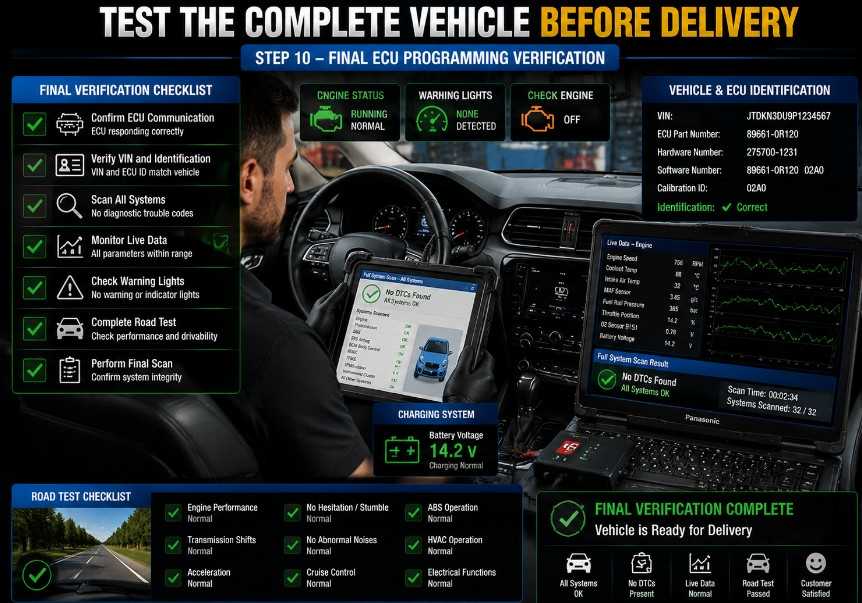
Do not consider the repair complete simply because the programmer reports a successful write.
Perform a complete verification:
- Confirm that the ECU communicates.
- Check that the VIN and identification data are correct.
- Scan every vehicle system.
- Clear temporary communication codes.
- Start the engine.
- Check warning lights.
- Monitor live data.
- Confirm throttle and accelerator response.
- Test transmission operation when applicable.
- Check cooling-fan operation.
- Verify charging voltage.
- Complete an appropriate road test.
- Scan the vehicle again after the road test.
- Check for leaks, loose connectors, or abnormal temperatures.
Retain the original file, final programmed file, diagnostic reports, and job notes with the repair record.
How to Choose the Right ECU Programmer
Before purchasing a programmer, provide the supplier with:
- Vehicle make
- Model
- Model year
- Engine
- Transmission
- Country or market
- ECU manufacturer
- ECU part number
- Hardware and software numbers
- Clear ECU label photographs
- Required operation
- Preferred OBD, bench, or boot method
Do not ask only whether a tool “supports the vehicle.” Support often depends on the exact ECU rather than the vehicle name.
For example, one engine may use different Bosch, Continental, Denso, Delphi, or Magneti Marelli ECUs depending on the production date and sales region.
Important Legal and Regional Considerations
Programming a replacement ECU for a legitimate repair is different from modifying emissions or vehicle-security systems.
Requirements vary by country, state, province, inspection program, and vehicle-use category. Before modifying calibration data:
- Check local emissions and road-use regulations.
- Confirm whether the vehicle is used on public roads.
- Obtain the vehicle owner’s authorization.
- Maintain proof of ownership for immobilizer work.
- Keep the original calibration backup.
- Do not turn off legally required emissions or safety systems.
- Consider warranty and insurance implications.
Vehicle coverage can also vary by region. A tool that supports a European-market vehicle may not support the North American, Australian, Middle Eastern, or Asian version if it uses a different ECU calibration or hardware configuration.
Frequently Asked Questions
Can I Install a Used ECU from Another Vehicle?
Sometimes, but it normally requires compatible hardware and additional cloning, coding, resetting, or immobilizer adaptation. Matching the connector and part-number family alone does not guarantee compatibility.
Is ECU Programming the Same as Chip Tuning?
No. ECU programming is a broad term that includes software installation, module replacement, cloning, coding, recovery, and adaptation. Chip tuning specifically refers to modifying calibration data.
Is OBD Programming Safer Than Boot Mode?
OBD programming is less invasive, but it is not automatically safer. Low voltage, network faults, unsupported protocols, or incorrect files can still interrupt the process.
Boot mode provides lower-level access but requires more technical skill and accurate connections.
Do I Need to Remove the ECU?
Not always. Many supported ECUs can be programmed through OBD. Bench or boot mode may be necessary for cloning, recovery, protected ECUs, or modules that no longer communicate in the vehicle.
Can the Same ECU File Be Used on Another Vehicle?
Do not assume that it can. Files may contain vehicle-specific coding, VIN data, injector calibration, immobilizer information, transmission configuration, or emissions settings.
What Causes ECU Programming Failure?
Common causes include:
- Low or unstable voltage
- Incorrect protocol selection
- Wrong wiring
- Unsupported ECU version
- Damaged communication circuits
- Laptop sleep or restart
- Loose USB connections
- Incorrect files
- Security access failure
- Interrupted internet access when online authentication is required
Conclusion
Successful ECU programming depends on correct diagnosis, exact ECU identification, stable power, compatible hardware, accurate wiring, complete data backups, and proper post-programming adaptation.
The safest workflow is:
- Diagnose the vehicle before replacing the ECU.
- Identify the exact ECU hardware and software.
- Confirm programmer and protocol compatibility.
- Stabilize vehicle and computer power.
- Read and save a complete original backup.
- Write only verified and compatible data.
- Complete coding, adaptation, and immobilizer matching.
- Test the complete vehicle after programming.
For help selecting a suitable ECU programmer, provide the vehicle details, ECU part number, hardware and software numbers, and clear photographs of the original ECU label.
Explore ECU Programming Tools
- PCMtuner ECU Chip Tuning Tool
- KT200 ECU Programmer and Chip Tuning Tool
- I-Flash OBD Programmer
- IO-PROG Programmer with DB9 Connector
For product compatibility information and technical support, contact sales@obdii.shop before ordering.
Leave a Reply