
The following guide provides step-by-step instructions for properly installing the preconcave assembly on a CLAAS Lexion 480 combine harvester.
Related Contents:
CLAAS CDS 7.5 Diagnostic Software 2021 2020 Free Download
CLAAS 4 CAN Diagnostic Interface
CLAAS WEBTIC OFFLINE ENGLISH 2025.03 Contains Repair Manuals and Service Information
Step-by-Step Installation Procedure
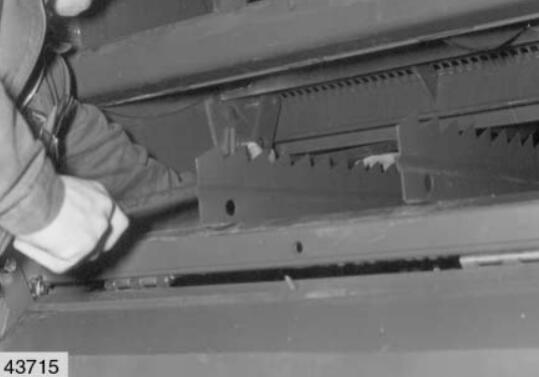
1. Position the Preconcave
- Place two squared timber blocks (approximately 170 mm high) under the preconcave (1).
- Slide the preconcave into the drum housing.
- Raise the rear end of the preconcave and guide it over the edge of the main concave.
2. Install Sealing Plates and Fasteners
- Insert sealing plates (3 and 7) between the machine housing and the preconcave on both left and right sides.
- Push the wear strips (4) into the elongated openings at the front, beneath the sealing plates.
- Insert hex-head bolts (6) through the mounting plates and bushings (5 and 8), including washers and retaining rings.
- Thread the bolts (6) loosely into the preconcave.
3. Fit the Main Concave Mounting Plates
- Using two tyre-mounting levers, lift the front of the main concave.
- Slide the mounting plates onto the locating pins on both sides.
- Secure the mounting plates using split pins and/or set collars.
4. Tighten the Preconcave Suspension Bolts
- Fully tighten bolts (6).
- Torque specification: 370 Nm

5. Install Remaining Structural Components
- Install disawner plates (9) and bolt the back brace (10) into position.
6. Fit the Preconcave Segments
- Lift and install the three preconcave segments (V) into the housing and secure them.
- Fold up the preparation floor cover (F) and tighten the retaining bolts.
7. Install Feed Plate and Covers
- Install feed plate (B) together with cover (K) and secure using bolts (T).
- Insert screw plug (S).
- If the machine is equipped with the maize configuration, install the special feed plate for the stone trap.
8. Close and Lock the Stone Trap
9. Adjust the Basic Concave Settings
Perform the manufacturer-specified base concave setting adjustments.
10. Tighten Guard and Drive Wheels
11. Install Feed Rake Conveyor
Complete assembly by installing the feed rake conveyor system.
More repair case for CLAAS,please refer to CLAAS Trouble Repair
Leave a Reply