The Function View in SCANIA SDP3 allows you to check, adjust, and calibrate systems at a function level. When you switch between main tabs, SDP3 automatically navigates to the corresponding level in the new tab. Any modifications made at the function level are applied across all relevant control units simultaneously.
1. Check – Troubleshooting with Guided Procedures
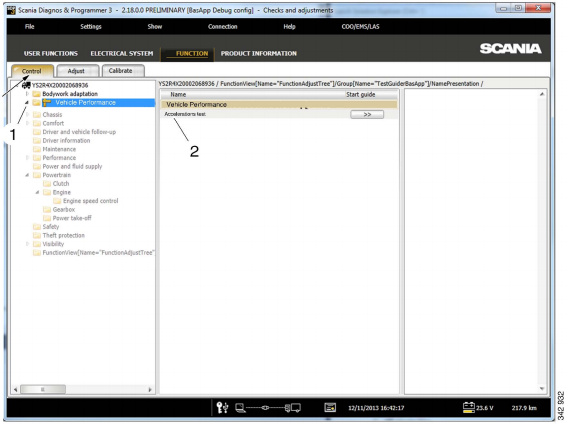
This section lets you troubleshoot functions using grouped guides. All guides related to a specific function appear together, regardless of which control units are involved.
If a Control Unit Fails to Respond
- The function will be marked with a cross in the navigation tree.
- Troubleshooting guides for that function cannot be started.
How to Use
- Select a group in the tree structure.
- Press the button for the chosen wizard to launch the guide.
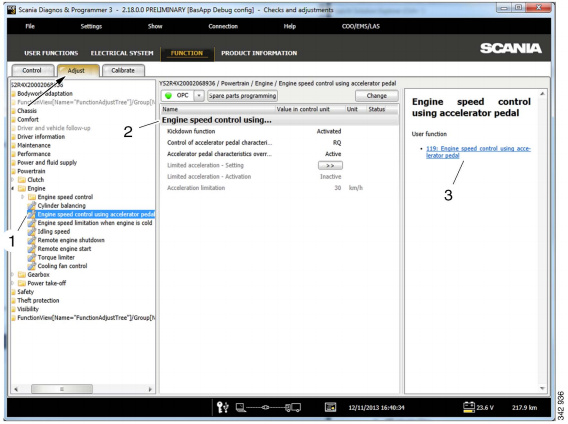
2. Adjustment – Editing Function Parameters
In this section, you can view and modify customer parameters grouped by function. All parameters associated with a function appear together. Adjusted settings are stored in the SOPS file so they can be restored when replacing any control unit.
Important Notes
- Resolve all vehicle fault codes before making adjustments.
- Control units must be spare part programmed before adjustments.
- A yellow dot indicates that spare part programming is required.
- A green dot confirms the programming is complete.
- If a required control unit does not respond, the function is marked with a cross and parameters cannot be edited.
A link to each parameter’s related user function is available for reference.
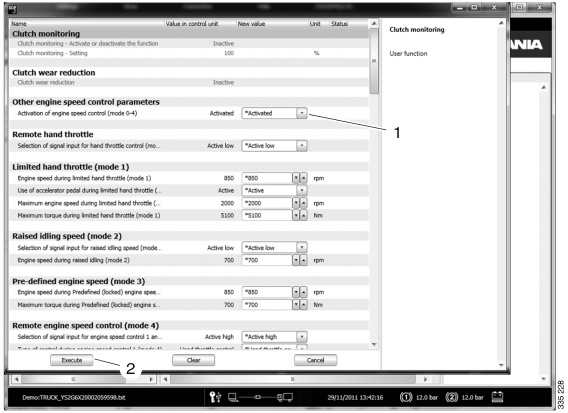
Adjusting Multiple Parameter Groups
- Select a parameter group in the tree structure.
- Press Change.
- Select a new value.
- A changed value is marked with a red dot.
- A flake symbol indicates the factory-set value.
- Press Execute.
- The related control units are reprogrammed.
- Successful changes are marked with a green tick.
- Failed changes remain marked with a red dot.

Adjusting a Single Parameter Group
- Select the parameter group to adjust.
- Press Change.
- Select the new value.
- Click Execute.
- Control units are reprogrammed.
- Successful adjustments show a green tick.
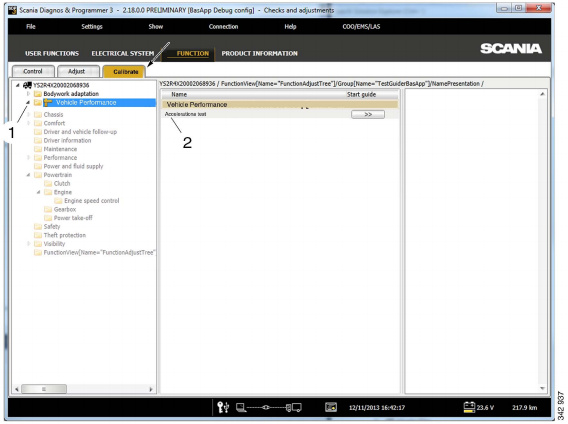
3. Calibration
Calibration guides are grouped in the same way as troubleshooting. All calibration guides needed for a function are displayed together, regardless of control unit.
If a Required Control Unit Does Not Respond
- The function is marked with a cross.
- Calibration cannot be started.
How to Start Calibration
- Select a group in the tree structure.
- Press the button for the selected wizard.
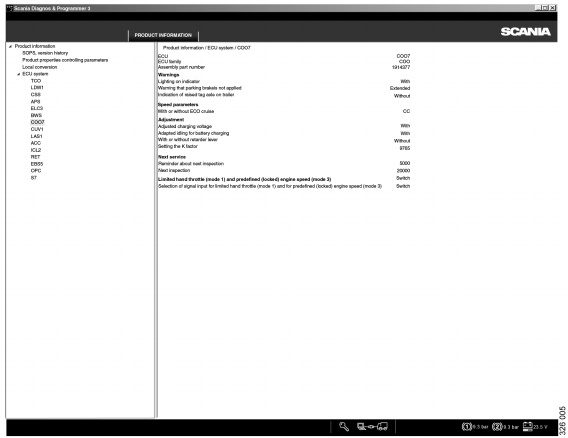
4. Product Information
This section displays key details about vehicle configuration, including:
- Available user functions
- Electrical chassis specifications
- Control unit parameter settings
- Timestamp and USB key details for parameter changes
- Any local conversions performed on the vehicle
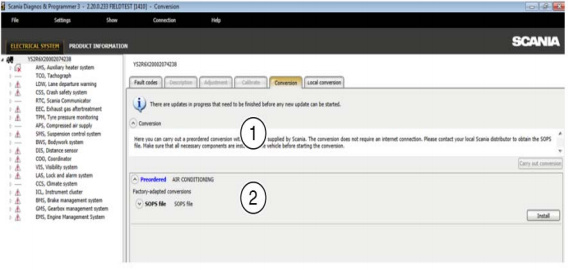
5. Conversion – Adaptations and Updates
The Conversion option allows you to perform adaptations and install pre-ordered updates (conversions) on the connected product.
Important
Conversions may reset certain control unit settings and calibrations. After conversion:
- Ensure parameters are correctly set.
- Recalibrate control units as needed.
For pre-ordered conversions, a network connection to Scania and Reflex access is required.
You can also reset SOPS files (requires a request submitted via FRAS).
Before resetting, verify any local conversions—they must be revalidated afterward.
Note: Scania is not responsible for conversions that violate national regulations.
You may also analyze stored operational data directly in SDP3 via View stored operational data.
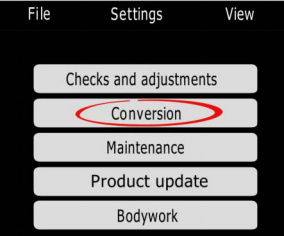
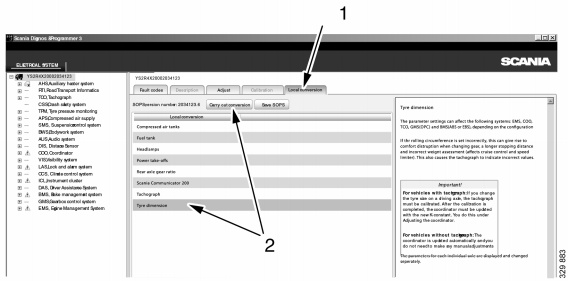
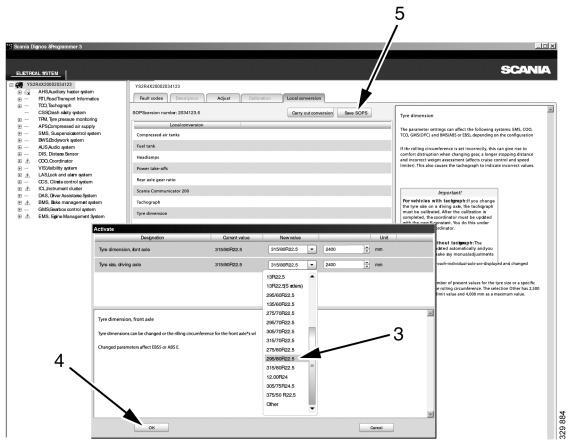
6. Local Conversion
This section shows details of any local conversions. You can perform local conversions by modifying parameters included in the conversion package. Control units affected are automatically reprogrammed.
After Performing a Local Conversion
- Send the updated SOPS file back to Scania.
This ensures correct information is displayed in Scania Multi.
Local Conversion Procedure
- Start SDP3 → select Conversion.
- Read and correct any fault codes.
- Highlight the vehicle level → choose Local conversion.
- Select the desired conversion and continue.
- Set new parameter values.
- Select OK.
- Save the SOPS file.
- Calibrate and reset any affected control units.
- Report the updated SOPS file to Scania.
7. Factory-Supported Conversion
Factory-supported conversions may come from:
- A SOPS file pre-ordered via Fras
- A SOPS file or control unit software pre-ordered via Conversion (Reflex)
Scania must always have the latest SOPS file from the vehicle before processing the conversion.
Important:
Do not perform any local conversion before installing a pre-ordered conversion, or the new SOPS file will become unusable.
A. Conversion Pre-Ordered via Helpdesk
- Send the current SOPS file and conversion details to Scania via FRAS.
- Scania returns an updated SOPS file.
- Save the new SOPS file locally.
- Ensure any new hardware is installed.
- Read and clear fault codes.
- Highlight vehicle → choose Conversion.
- Back up the existing SOPS file.
- Click Execute and select the updated SOPS file.
- Follow the dialogue instructions to complete the process.

B. Conversion Pre-Ordered via Reflex
- Install all components required for the conversion.
- Read and rectify any fault codes.
- Select the vehicle level → choose Conversion.
- Click Install.
- Follow instructions on screen.
- A confirmation is automatically sent to Scania.
- Operational data is uploaded if software was updated.
- Recalibrate and adjust any affected control units (some parameters may reset).
Note: All fault codes are automatically cleared when this work option is completed.
Leave a Reply