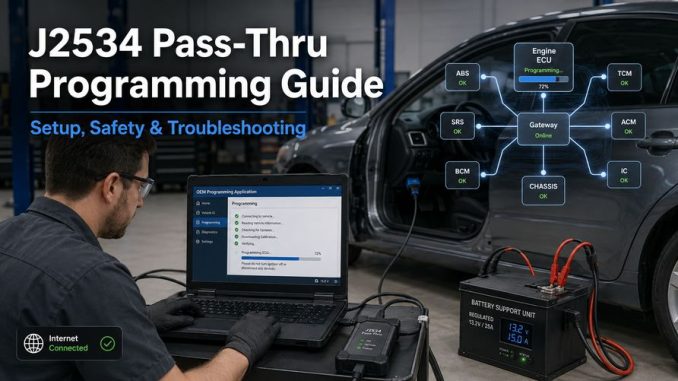
Quick Answer
SAE J2534 is a standardized interface between PC-based vehicle-manufacturer software and a vehicle communication interface used primarily for ECU reprogramming. A complete programming setup requires compatible J2534 hardware, the correct driver/API, OEM software, access to the required calibration, stable vehicle power, and a compatible vehicle/controller. J2534 hardware alone does not supply OEM firmware or guarantee diagnostic, coding, or programming coverage.
Key Takeaways
- J2534 is an interface standard, not OEM programming software.
- SAE J2534-1 primarily addresses emissions-related module reprogramming.
- J2534-2 contains optional extended features.
- “J2534 compatible” does not mean “validated by every OEM.”
- A generic J2534 interface is not automatically a full-system diagnostic scanner.
- OEM software and calibration access are usually required.
- Programming voltage requirements must follow the specific OEM procedure.
- Do not start programming when communication or battery power is unstable.
- Diagnose “PC cannot detect VCI” separately from “VCI cannot communicate with vehicle.”
- Heavy-duty programming commonly uses RP1210-family interfaces rather than treating J2534 as a universal truck standard.
What Is SAE J2534 Pass-Thru Programming?
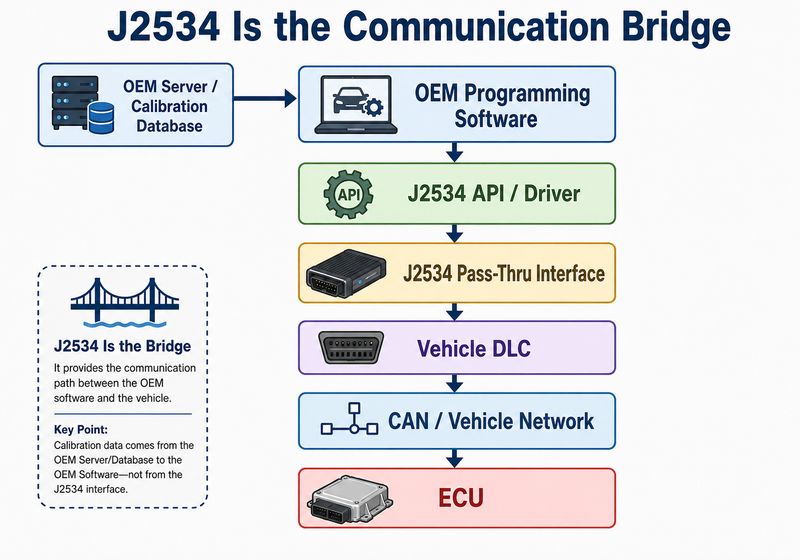
SAE J2534 defines a standardized connection layer between a personal computer and a vehicle communication interface so vehicle-manufacturer software can control ECU reprogramming. SAE’s current J2534-1 documentation states that the goal is to let OEM reprogramming applications work with standardized aftermarket interfaces while the vehicle manufacturer still controls the actual programming sequence.
A typical setup looks like this:
OEM Programming Software → J2534 API/Driver → Pass-Thru Interface → Vehicle Network → ECU
The J2534 interface transfers messages.
The OEM application determines:
- Which ECU is being programmed
- Which calibration is applicable
- The programming sequence
- Required ignition changes
- Security procedures
- Post-programming instructions
The interface does not independently decide which firmware belongs in an ECU.
EPA service-information rules were an important reason standardized pass-thru programming became available to independent repairers, with EPA documentation discussing SAE J2534 implementation for 2004 and later model-year applications.
J2534-1 vs J2534-2: What Is the Difference?
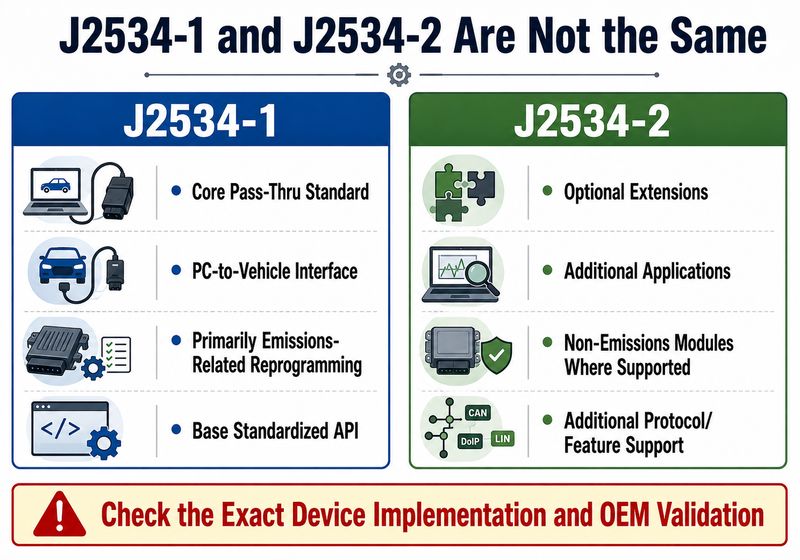
J2534-1 is the core standardized pass-thru interface, while J2534-2 defines optional extended capabilities. SAE describes J2534-1 around emissions-related reprogramming, particularly 2004-and-later applications. SAE created J2534-2 because pre-2004 vehicles, non-emissions modules, and other optional functions may need additional support. A J2534-1 label therefore does not automatically imply every J2534-2 feature.
| SAE J2534-1 | Core standardized PC-to-vehicle pass-thru interface |
| SAE J2534-2 | Optional extensions beyond the core requirement |
When comparing tools, ask:
- Which J2534 revision is implemented?
- Which J2534-2 features are supported?
- Does the target OEM validate the device?
- Which firmware/API version does the OEM require?
- Does the required vehicle protocol have hardware support?
The last question matters because software compliance cannot add a physical network transceiver the interface doesn’t include.
Where Does J2534 Apply—and Where Does It Not?
J2534 is most relevant to PC-based light-duty vehicle ECU reprogramming using OEM applications. It may also support other diagnostic or programming functions when the OEM application and interface do, but you should not assume those capabilities. Heavy-duty truck and equipment workflows frequently use different standards, including RP1210, OEM-specific VCIs, and dedicated service applications.
Typical J2534 applications
- Powertrain Control Module (PCM) calibration
- Engine Control Module (ECM) software updates
- Transmission Control Module (TCM) calibration
- Certain replacement-module programming procedures
- OEM-supported ECU reflashing
Exact coverage depends on the manufacturer.
Do not assume J2534 replaces
- OEM scan tools for every diagnostic function
- ECU bench programmers
- EEPROM programmers
- Immobilizer/key programmers
- Heavy-duty RP1210 interfaces
- ADAS calibration equipment
- Security credentials
- OEM software subscriptions
Toyota specifically notes that approved J2534 devices used for reprogramming are not automatically full diagnostic scan tools.
J2534 Programming Is Not the Same as Diagnostics or Coding
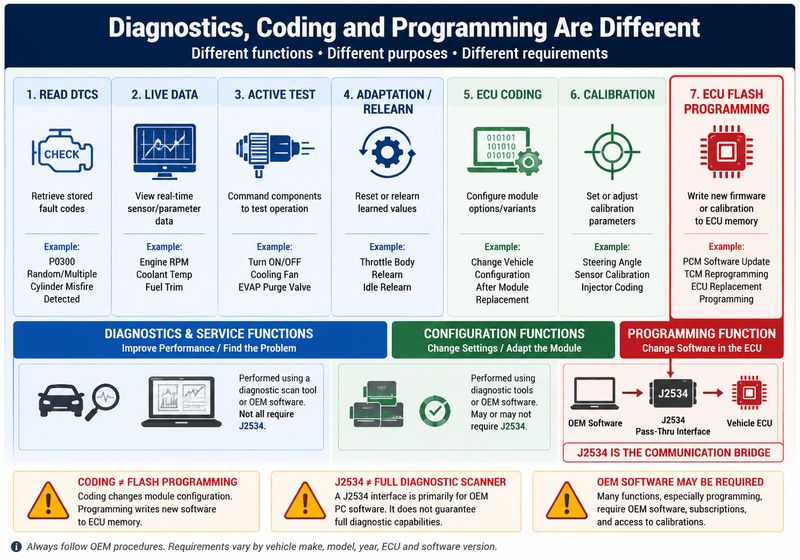
J2534 describes a communication interface; it does not merge every electronic service procedure into one function. A technician should separate fault-code reading, active testing, adaptation, coding, calibration, and firmware programming because each operation has different prerequisites and risks. Toyota’s J2534 documentation explicitly distinguishes pass-thru reprogramming from complete diagnostic scan-tool capability.
| Function | Purpose | Typical example |
| Read DTCs | Retrieve stored faults | P0300 misfire code |
| Live data | View ECU parameters | Fuel pressure |
| Active test | Command an actuator | Cooling fan ON |
| Adaptation | Reset/relearn learned values | Throttle relearn |
| Coding | Configure module options | Replacement ECU configuration |
| Calibration | Establish sensor/reference values | Steering-angle calibration |
| ECU programming | Write firmware/calibration | PCM software update |
| Software installation | Install PC application | Installing OEM programming software |
A scanner advertised as supporting ECU coding does not necessarily flash OEM firmware.
Likewise, a J2534 interface capable of firmware flashing does not necessarily provide full bidirectional diagnostics.
What Equipment Is Required for J2534 Programming?
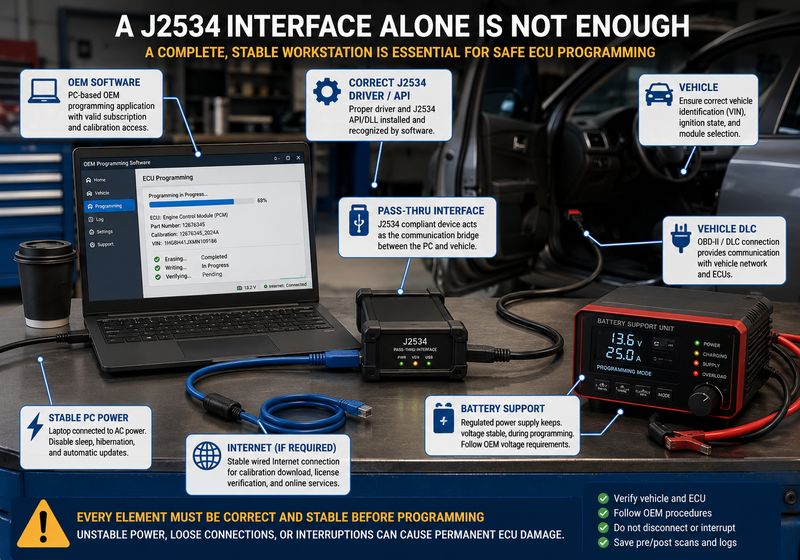
A usable J2534 workstation normally consists of five separate elements: a compatible Windows PC, a supported pass-thru interface, the interface manufacturer’s driver/API, OEM programming software with valid access, and a vehicle power-support system suitable for the manufacturer’s programming procedure. Missing any one of these can prevent programming even when the other components are working correctly.
1. Computer
Check the OEM’s current requirements for:
- Windows version
- Processor
- RAM
- Free storage
- Browser/runtime components
- Administrative permissions
- Internet connection
Do not copy PC requirements from another OEM.
2. J2534 Pass-Thru Interface
Verify:
- J2534-1 support
- Required J2534-2 features
- OEM validation
- Required vehicle network
- Firmware revision
- Driver/API version
3. Interface Driver and J2534 API
The PC must have the correct vendor software installed.
Depending on the interface, this may install:
- USB drivers
- Ethernet configuration utilities
- Firmware updater
- J2534 DLL/API
- Device-selection utility
A COM port is usually not the primary configuration item for J2534. Do not change COM-port settings unless the specific device manufacturer’s instructions require it.
4. OEM Software and Subscription
Examples of OEM ecosystems include:
- Toyota TIS / Techstream
- Ford J2534-related software
- Honda i-HDS / Honda J2534 tools
- GM programming applications
Toyota requires the appropriate TIS professional subscription and calibration access for its supported J2534 reprogramming workflow.
5. Battery Support
Use a regulated vehicle power-support unit appropriate for programming.
The required voltage and mode must come from the exact OEM procedure.
What Should Be Checked Before Programming?
Don’t press the Program button just because the OEM application recognizes the car. Verify the complete programming environment first: VIN, ECU identification, calibration eligibility, vehicle power, PC power, interface connection, OEM account, network stability, and any pre-existing communication faults. Programming a module through an unstable electrical or network connection creates a much greater risk than delaying the job to correct the underlying condition.
Pre-Programming Checklist
- Confirm VIN.
- Confirm model and model year.
- Confirm engine or powertrain configuration.
- Identify the exact ECU.
- Record existing DTCs.
- Save the pre-scan when possible.
- Confirm current ECU calibration.
- Verify the intended calibration applies.
- Confirm the correct J2534 interface is selected.
- Confirm interface firmware/API.
- Confirm OEM subscription.
- Disable PC sleep and hibernation.
- Connect approved battery support.
- Close unnecessary Windows applications.
- Use a stable Internet connection if the OEM application requires online access.
Toyota warns that a flash can permanently damage a controller if reprogramming is interrupted and specifically warns against disconnecting the programming device or allowing the PC to enter standby/hibernation.
What Problems Commonly Prevent J2534 Programming?
Most J2534 failures fall into one of four categories: PC/interface problems, vehicle/network problems, OEM software or authorization problems, and unstable programming conditions. Start with the cheapest and least invasive checks before suspecting a failed ECU. Replacing a J2534 interface will not fix a blown diagnostic-link fuse, wrong driver version, expired OEM subscription, or an offline vehicle network.
| Priority | Possible cause | First check |
| 1 | Wrong/missing J2534 driver | Device utility / Windows detection |
| 2 | Wrong interface selected | OEM application settings |
| 3 | Interface not powered | Interface LEDs / cable |
| 4 | DLC power/ground issue | Vehicle wiring information |
| 5 | Incorrect vehicle selection | VIN / ECU identification |
| 6 | OEM subscription/login problem | Account status |
| 7 | Incorrect firmware/API | OEM validated-device list |
| 8 | Vehicle CAN/network fault | Pre-scan / network diagnosis |
| 9 | Calibration not applicable | OEM TSB/calibration information |
| 10 | ECU internal failure | Only after power/network tests |
Step-by-Step J2534 Programming Workflow
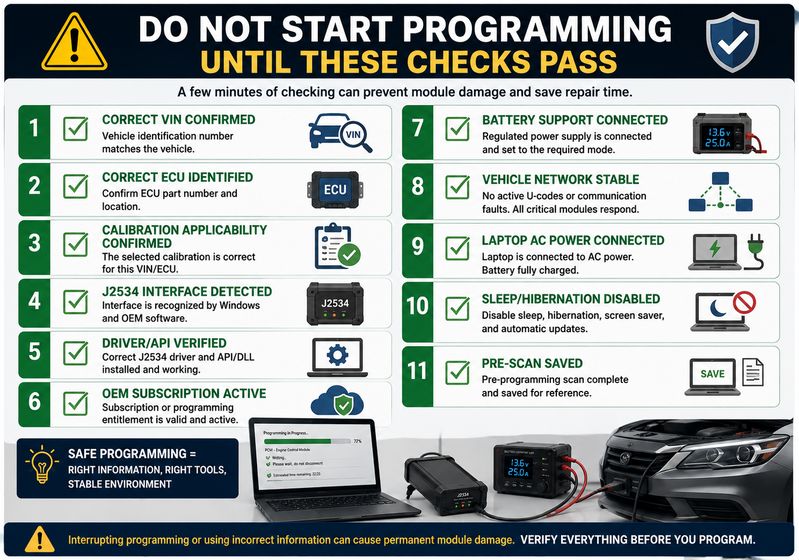
A safe programming workflow starts with diagnosis, not reflashing. First prove that a software update or replacement-module procedure is actually required. Then verify interface compatibility and power stability, preserve the original vehicle information, and follow the OEM application’s prompts without improvising. After programming finishes, complete every required initialization, relearn, scan, and functional test before returning the vehicle.
Step 1 — Diagnose the Original Problem
Read the applicable DTCs.
Review:
- Freeze-frame data
- Live data
- Network faults
- OEM Technical Service Bulletins (TSBs)
- Calibration information
Do not reflash an ECU simply because a fault code exists.
Software will not necessarily correct a wiring, sensor, mechanical, voltage, or network fault.
Step 2 — Confirm a Programming Procedure Exists
Use the OEM service portal to determine whether:
- A later calibration exists.
- The calibration applies to the VIN.
- A service bulletin calls for programming.
- The replacement ECU requires initialization.
Toyota, for example, distributes current calibration files through TIS and ties applicable updates to service information.
Step 3 — Install the Correct J2534 Driver
Install the interface manufacturer’s current software according to its instructions.
Then verify that:
- Windows sees the device.
- The vendor utility recognizes it.
- Firmware is correct
- The J2534 API/DLL is installed.
Step 4 — Confirm OEM Software Recognizes the Interface
Launch the OEM application.
Select the intended J2534 interface if the software provides a device-selection menu.
Do not proceed if the OEM application cannot reliably recognize the interface.
Step 5 — Connect the Vehicle Power-Support Unit
Use the OEM-required support mode.
Do not use an ordinary low-current trickle charger when the procedure calls for a programming power supply.
Step 6 — Connect the J2534 Interface
Use:
PC → J2534 Interface → Vehicle DLC
Keep cables away from:
- Pedals
- Door hinges
- Hot exhaust parts
- Moving fans
- Areas where someone may unplug them
Step 7 — Perform a Pre-Scan
Check for:
- Low-voltage DTCs
- CAN communication faults
- Modules with No Response
- Unstable network behavior
Resolve significant communication faults before programming.
Step 8 — Identify the ECU and Calibration
Confirm:
- VIN
- ECU number
- Existing calibration
- Replacement-module identification when applicable
If the displayed information clearly does not match the vehicle, stop.
Step 9 — Start the OEM Programming Procedure
Follow the OEM application’s instructions exactly.
Do not:
- Disconnect the J2534 device.
- Turn ignition off unless instructed.
- Cycle ignition early
- Close the application
- Allow Windows to restart
- Allow the laptop to sleep.
- Disconnect battery support
Step 10 — Complete Post-Programming Instructions
The OEM application may request:
- Ignition cycle
- ECU reset
- Variant configuration
- Relearn
- Immobilizer operation
- Calibration
- DTC clearing
Do not assume that “Programming Successful” means the entire repair is finished.
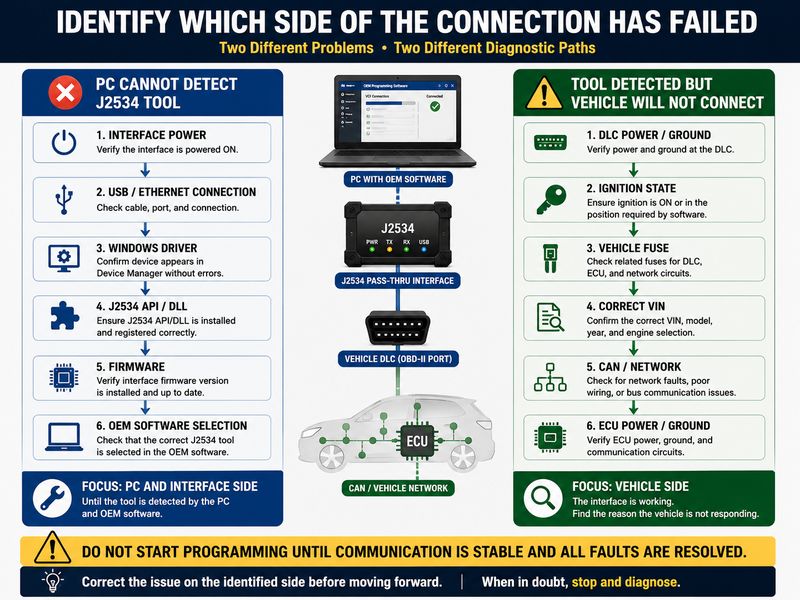
J2534 Tool Not Detected by the Computer: What Should You Check?
If the computer cannot detect the J2534 interface, don’t troubleshoot the vehicle CAN bus yet. The fault is on the PC-to-interface side until proven otherwise. Check interface power, USB/Ethernet connection, Windows detection, vendor drivers, firmware, and the installed J2534 API. A working vehicle connection cannot compensate for a pass-thru device that Windows or the OEM software does not recognize.
Check in this order:
- Interface power
- USB/Ethernet cable
- Different direct USB port
- Windows Device Manager
- Vendor interface utility
- Correct driver installation
- J2534 API/DLL installation
- Interface firmware
- OEM application device-selection menu
- PC restart if required.
USB hub warning
For programming, use a reliable direct connection when the interface manufacturer recommends one.
Avoid introducing unnecessary USB adapters or damaged extension cables.
Do not chase COM ports unnecessarily.
Most J2534 programming applications communicate through the J2534 API rather than requiring the technician to manually choose a serial COM port.
Only configure a COM port when the specific interface documentation requires one.
J2534 Tool Is Detected but Cannot Communicate With the Vehicle
If Windows and the OEM application detect the J2534 device but no vehicle controllers respond, move your diagnosis to the vehicle side. Verify diagnostic-connector power and grounds, ignition state, vehicle identification, relevant fuses, network health, and whether the interface supports the vehicle’s required communication architecture. An interface detected by Windows can still be electrically unable to communicate with the target ECU.
Check:
- Vehicle battery condition
- DLC power and grounds
- Relevant diagnostic/ECU fuses
- Ignition state
- Correct VIN/model selection
- Required cables/adapters
- Interface protocol capability
- CAN/network DTCs
- ECU power and grounds
- Gateway/security requirements
One ECU is offline
If most modules communicate but one does not, focus on:
- That ECU’s power
- Ground
- Network branch
- Connector
- Internal failure
Do not replace the J2534 interface first.
Every ECU is offline.
If nothing communicates, investigate common causes such as:
- DLC power loss
- Main network problem
- Incorrect interface configuration
- Wrong vehicle selection
- Interface/vehicle cable problem
Why Can Programming Start and Then Fail?
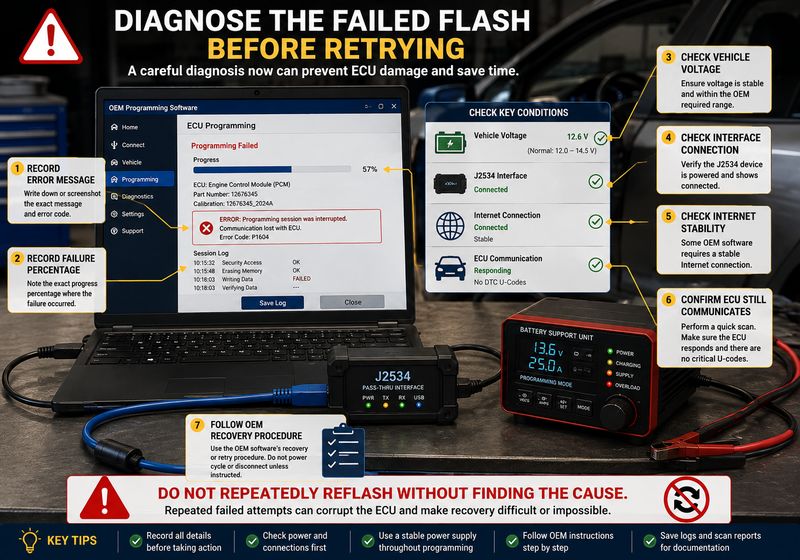
A programming session that begins normally but stops mid-write points to a different fault class than an interface that never connects. Common suspects include unstable vehicle voltage, laptop power management, lost Internet access, a disturbed cable, interface firmware/driver incompatibility, or an interruption demanded by the OEM application’s backend. Determine the exact failure stage before attempting another flash.
Record:
- Error message
- Percentage completed
- ECU identification
- Interface model
- Firmware version
- J2534 API version
- OEM software version
- Vehicle voltage
- Whether the ECU still communicates
Do not repeatedly attempt programming if the ECU becomes unresponsive.
Repeated failed write attempts can complicate recovery.
Normal vs Abnormal J2534 Results
A healthy J2534 environment has to pass several layers: Windows recognizes the interface, the OEM application recognizes the J2534 API, the interface communicates with the vehicle, the correct ECU is identified, the calibration is accepted, and the programming session completes without communication or voltage faults. A green USB indicator alone proves only one part of that chain.
| Check | Normal result | Abnormal result |
| Windows | Interface detected | Unknown/missing device |
| Vendor utility | Device and firmware shown | Device not found |
| OEM application | Correct interface selectable | No J2534 interface |
| Vehicle connection | VIN/ECUs respond | No communication |
| ECU identification | Correct part/calibration | Wrong or missing ID |
| Network | Stable communication | U-codes/dropouts |
| Power | Inside OEM-defined programming range | Voltage unstable/out of range |
| Programming | Completes without interruption | Stops/errors |
| Post-scan | Expected modules respond | ECU remains offline |
Should You Test the CAN Bus Before Programming?
CAN testing is appropriate when the pre-scan shows network instability, multiple modules intermittently disappear, or the J2534 interface communicates inconsistently with the vehicle. Do not measure network resistance merely because programming software gives a login error or Windows cannot load a J2534 driver. Only do electrical network testing after you’ve localized the fault to the vehicle side.
Inspect:
- Network DTCs
- ECU power supplies
- Grounds
- Connector corrosion
- CAN wiring damage
- Termination where applicable
- Aftermarket accessories connected to the network
Confirm exact CAN measurements and connector pins based on the specific vehicle, network architecture, controller, and service manual.
Modern gateway-based and Ethernet-based vehicles should not be diagnosed using one universal resistance or pinout rule.
J2534 and Heavy-Duty Trucks: Are They the Same Workflow?
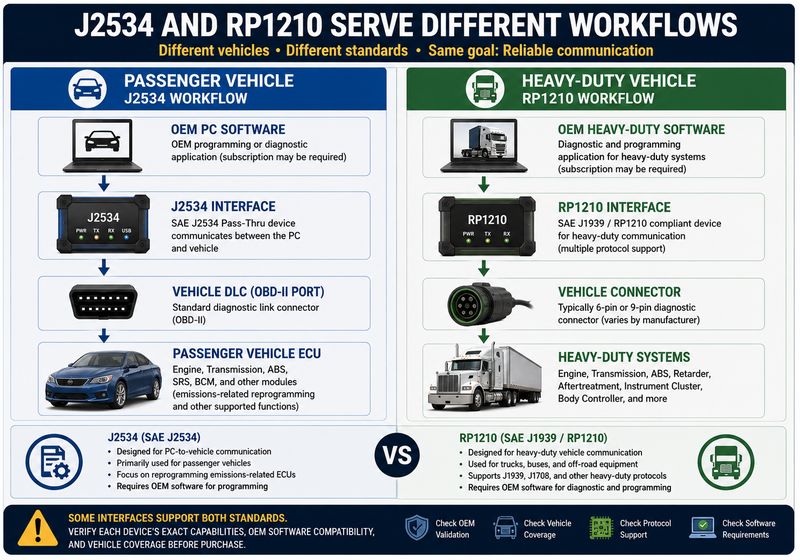
Not usually. SAE J2534 is primarily associated with light-duty pass-thru programming, while heavy-duty service environments commonly use RP1210-compatible interfaces and OEM applications. EPA documentation specifically describes RP1210B as the heavy-duty equivalent of SAE J2534 for standardized pass-through programming. Some modern interfaces support both standards, but don’t assume support for one based on support for the other.
For equipment such as:
- Caterpillar
- Cummins
- Detroit Diesel
- Volvo/Mack
- John Deere
- CNH
- JCB
- Doosan
use the OEM’s specified communication interface and software workflow.
A product advertising J2534 + RP1210 + D-PDU is providing multiple communication capabilities, not one universal protocol.
Common J2534 Mistakes and How to Correct Them
Most expensive J2534 mistakes occur before the flash begins: the technician assumes compatibility, skips the pre-scan, uses an unstable power source, or confuses ECU coding with firmware programming. The safest correction is to verify the OEM procedure first, then match the vehicle, ECU, interface firmware, API, and subscription to that procedure. Never use advertising terms as a substitute for an OEM compatibility list.
Mistake 1 — Assuming “J2534 compatible” means every OEM supports it.
Correction: Check the manufacturer validated-device list.
Toyota explicitly recommends using interfaces whose specific device, firmware, API and software combinations have been validated.
Mistake 2 — Buying hardware before checking the OEM software
Correction: Research the OEM application, subscription, and PC requirements first.
Mistake 3 — Confusing programming with coding
Correction: Define the exact job:
firmware flash, module configuration, adaptation, immobilizer setup, or calibration?
Mistake 4 — Starting with existing network faults
Correction: Diagnose unstable U-codes and communication dropouts before writing software.
Mistake 5 — Using one battery-voltage rule for every vehicle
Correction: Follow the OEM procedure for the exact vehicle.
Mistake 6 — Allowing Windows sleep or automatic restart
Correction: Disable disruptive power-management behavior before programming.
Toyota specifically warns against allowing the PC to enter standby or hibernation during flash programming.
Mistake 7 — Assuming a successful flash completes the repair
Correction: Perform required relearns, coding, DTC clearing, and function tests afterward.
When Should You Stop Programming?
Stop the procedure before starting—or stop further recovery attempts—when you can’t positively verify the vehicle, ECU, interface, or electrical environment. ECU programming is not the place to experiment with uncertain drivers, questionable calibration files, unstable vehicle voltage, intermittent CAN communication, or unidentified replacement modules. Toyota explicitly warns that interrupting reprogramming can permanently damage a controller.
Do not begin if:
- VIN cannot be confirmed.
- ECU identity is wrong.
- Calibration applicability is uncertain.
- Vehicle voltage is unstable.
- Communication repeatedly drops.
- J2534 interface is intermittently disconnecting.
- Required OEM account is unavailable.
- OEM software reports an incompatible interface.
- Required security authorization is missing.
- Laptop battery/power is unreliable.
Stop recovery attempts and seek specialist support if:
- ECU no longer communicates after a failed flash.
- OEM software requests a recovery procedure you do not understand.
- Programming repeatedly fails at the same stage.
- A safety-critical ECU remains offline.
- High-voltage EV procedures require qualifications or PPE you do not have.
How Do You Verify a J2534 Programming Repair?
Verification should prove both that the flash completed and that the vehicle functions correctly afterward. Read the ECU identification again, confirm the new calibration when the OEM application provides that information, clear applicable DTCs, cycle ignition as instructed, run a complete post-scan, and perform every required relearn or calibration. Do not return the vehicle solely because the programming screen displayed “Successful.”
Final Verification Checklist
- Programming completed without interruption.
- ECU communicates normally.
- ECU part number is correct.
- Calibration identification is correct.
- Programming-related DTCs cleared.
- No unexpected network DTCs remain.
- Other modules communicate.
- Required coding completed.
- Required relearns completed.
- Required calibrations completed.
- Relevant live data is plausible.
- Warning lamps operate normally.
- Engine starts/runs where applicable.
- Road or functional test completed when appropriate.
- Final scan saved.
How Should You Choose a J2534 Interface?
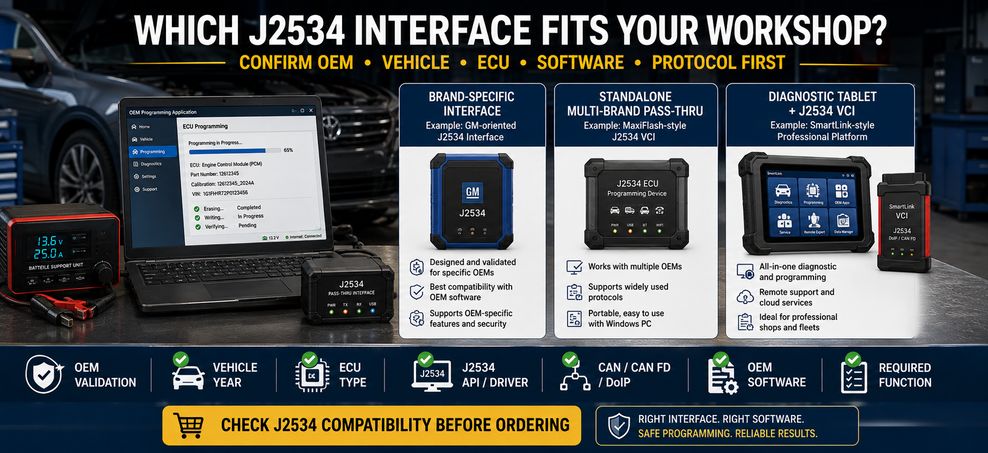
Choose the interface based on the OEM programming work you actually perform, not the longest protocol list on a product page. First check whether the manufacturer validates the device and the exact firmware/API combination. Then compare physical protocols, driver support, connection method, and whether you need standalone pass-thru hardware or a scanner that can also act as a J2534 VCI.
For a GM-focused workshop
The Mongoose Pro GM II listed by obdii. shop is positioned as a GM-focused J2534 diagnostic/programming interface.
The current product page still references older GM software terminology such as TIS2WEB, so confirm compatibility with the exact GM programming application, Windows version, vehicle year, and target ECU before ordering.
This type of interface is best for a workshop focused on GM rather than a general-purpose pass-through interface for every brand.
For a standalone multi-protocol J2534 interface
obdii. shop lists the Autel MaxiFlash Elite as an SAE J2534-1/J2534-2 pass-thru interface.
It may suit technicians who already understand OEM PC software and need dedicated pass-through hardware. The important caveat is that J2534 compliance alone does not prove validation by the target OEM. Check the manufacturer’s current device list first.
For a diagnostic scanner plus J2534 workflow
The LAUNCH X431 PRO3S+ Elite with SmartLink 2.0 combines a professional diagnostic tablet with a SmartLink interface that the product documentation identifies as a J2534 pass-through device usable locally with PC-based OEM software.
This approach is better for a shop that wants full-system scanning and bidirectional diagnostics, plus PC-based pass-thru capability. You must still verify exact OEM compatibility by vehicle, ECU, software release, and required protocol.
Browse J2534 Options
For other brand-specific and multi-brand interfaces:
Before purchasing, provide:
Vehicle make + model + year + VIN + ECU + OEM software + required function
Do not ask only, “Does this support J2534?”
Frequently Asked Questions
What does J2534 mean?
SAE J2534 is a standardized PC-to-vehicle pass-thru interface specification used to allow compatible vehicle-manufacturer software to communicate through third-party interface hardware for ECU reprogramming. OEM software, not the J2534 device itself, controls the actual programming sequence.
Is a J2534 device an ECU programmer by itself?
No. A J2534 interface normally requires compatible OEM or other supported programming software, the correct driver/API, calibration access, and often an OEM subscription. The interface primarily provides the communication path between the PC and vehicle.
What is the difference between J2534-1 and J2534-2?
J2534-1 defines the core standardized interface used primarily for emissions-related reprogramming. J2534-2 defines optional extensions intended to support additional applications such as non-emissions modules and certain older vehicles.
Can any J2534 device program any car?
No. Hardware, firmware, J2534 API version, OEM software, vehicle protocol, and ECU coverage must all be compatible. Toyota specifically recommends using validated combinations of device hardware, firmware, DLL/API and software.
Does J2534 include diagnostic functions?
Not necessarily. An OEM application may use a J2534 interface for diagnostics, but J2534 compliance itself does not guarantee full-system scanning, active tests or service functions. Toyota explicitly distinguishes approved J2534 reprogramming interfaces from full diagnostic scan tools.
Do I need an OEM subscription?
For many manufacturer reprogramming workflows, yes. Access conditions differ by OEM. Toyota, for example, requires an appropriate professional TIS subscription for Techstream and ECU calibration access.
Why does Windows detect my J2534 tool but the car will not connect?
That usually means the PC-to-interface layer is working, but the vehicle-side communication path still needs diagnosis. Check vehicle power, diagnostic connector power/grounds, fuses, ignition state, correct vehicle identification, interface protocol capability, and network health.
Why does my OEM software not show my J2534 interface?
Common causes include an incorrect or missing interface driver, a missing J2534 API/DLL, an incompatible API version, the wrong interface selection, outdated firmware, or an OEM application that does not support that device/version.
Is J2534 the standard used for heavy-duty truck diagnostics?
Not generally. EPA documentation describes RP1210B as the heavy-duty equivalent of the light-duty J2534 pass-thru concept. Some interfaces support both, but they are separate capabilities.
Can programming damage an ECU?
Yes. An interrupted or incorrect programming event can leave a controller non-responsive or permanently damaged. Toyota specifically warns that reprogramming must not be interrupted and that the interface and PC must remain operational throughout the procedure.
Conclusion
SAE J2534 gives independent technicians a standardized path for using compatible PC-based OEM software with third-party pass-thru hardware, but J2534 is only one part of the programming system. SAE defines the interface; the vehicle manufacturer still controls the software, calibration, sequence, and application-specific requirements.
For a reliable programming job, verify five things before starting:
Correct Vehicle → Correct ECU → Correct OEM Software → Validated J2534 Interface → Stable Programming Environment
Do not buy a pass-thru tool solely because the description says “J2534.”
Check the exact:
- Vehicle
- Year
- ECU
- OEM application
- Interface firmware/API
- Communication protocol
- Required programming function
For compatible interface options, browse:
J2534 Diagnostic & Programming Tools:
https://www.obdii.shop/search.php?q=j2534&DirID=
https://www.obdii.shop/search.php?q=j2534&DirID=
Confirm compatibility before ordering, especially for late-model vehicle networks, security access, replacement-module programming, or manufacturer-specific software.
Leave a Reply