
This guide provides step-by-step instructions for removing and installing the air conditioning compressor on the HITACHI EX5600 excavator.
Related Contents:
Hitachi Excavator Heavy Duty Diagnostic Tool with MPDr 3.9 Software
Overview
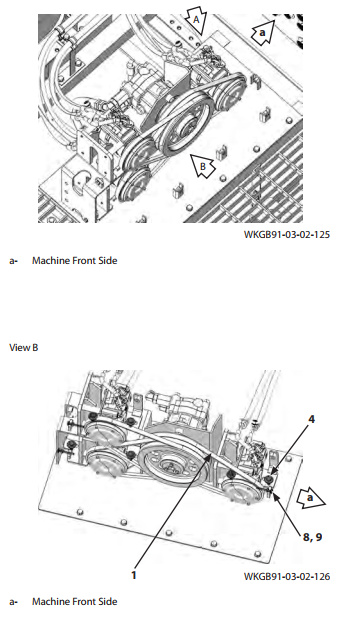
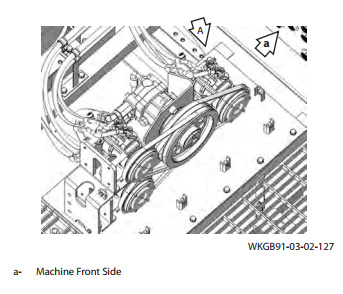
The air conditioning compressor is located at the rear of the cab’s loading area. There are three air conditioning compressors, and their removal and installation procedures are nearly identical. This guide focuses on the removal and installation of the rear air conditioning compressor (B).
Safety Precautions
CAUTION: Refrigerant is harmful to the environment. Always recover all refrigerant before starting. Only trained and qualified technicians should perform refrigerant-related maintenance, refilling, and recovery procedures.
IMPORTANT: If any hoses or pipes are removed, plug their open ends to prevent contamination. Use identification labels on fittings, hoses, and pipes for correct reassembly. If securing clips are removed, reinstall them after reconnecting the hoses.
Removal Procedure
- Prepare the Machine
- Move the excavator to the inspection and maintenance position.
- Turn off the engine and breaker. (Refer to W1-6-1 for details.)
- Remove the Protective Cover
- Unscrew and remove the six screws and washers (2).
- Detach the cover (1).
- Tool size: 17 mm
- Recover the Refrigerant
- Connect a refrigerant recovery device to the compressor’s connection points (3) (two locations).
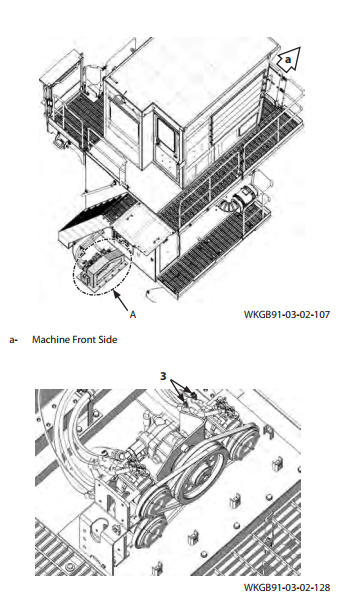
- Connect a refrigerant recovery device to the compressor’s connection points (3) (two locations).
- Loosen and Remove Components
- Loosen the four screws and washers (4) (two used).
- Loosen the lock nut (9).
- Adjust the tension and remove the belt (1) using the adjusting screw (8).
- Tool sizes:
- Screw, washer (4) – 17 mm
- Adjusting screw (8), lock nut (9) – 13 mm
- Disconnect Hoses and O-Rings
- Remove the five screws (10) (two used).
- Disconnect the hoses (5) (two used) and remove the O-rings (6) (two used).
- Tool size: 10 mm
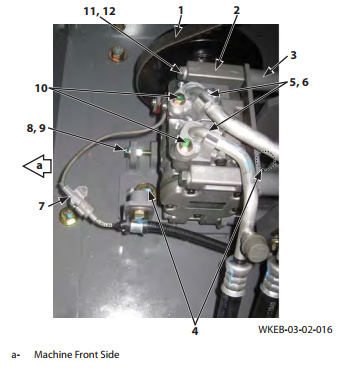
- Remove the Plug
- Detach the plug (7).
- Detach the plug (7).
- Remove the Compressor
- Unscrew and remove the four screws (11) and washers (12) (four used).
- Remove the air conditioning compressor (2) from the bracket (3).
- Tool size: 13 mm
Installation Procedure
- Mount the Air Conditioning Compressor
- Attach the compressor (2) to the bracket (3) using four screws (11) and washers (12).
- Tool size: 13 mm
- Torque specification: 27 N·m (20.0 lbf·ft)
- Reconnect Hoses and O-Rings
- Apply compressor oil to the two O-rings (6).
- Install the O-rings onto the hoses (5).
- Secure the hoses (5) using two screws (10).
- Tool size: 10 mm
- Torque specification: 10 N·m (7.5 lbf·ft)
- Install and Adjust the Belt
- Install the belt (1).
- Adjust the tension using the adjusting screw (8) and tighten the lock nut (9).
- Tool size: 13 mm
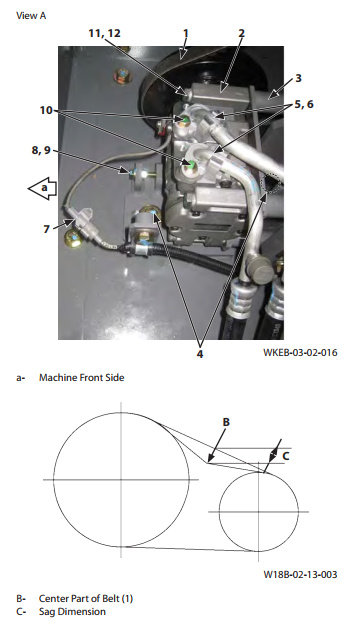
IMPORTANT: If a new belt is installed, it may stretch after initial use. Let the engine idle for 3 to 5 minutes, then readjust the belt tension.CAUTION: To ensure proper tension, press the center of the belt (1) with a force of 98 N (72 lbf). The deflection (C) should be between 11 to 12 mm (0.433 to 0.472 in).
- Reconnect the Plug
- Reattach the plug (7).
- Reattach the plug (7).
- Secure the Bracket
- Fasten the bracket (3) using two screws and washers (4).
- Tool size: 17 mm
- Torque specification: 50 N·m (37 lbf·ft)
- Recharge the Refrigerant
- Connect the refrigerant charging device to connections (3) (two locations).
- Refill the system with refrigerant.
CAUTION: Refrigerant handling should only be performed by trained and qualified technicians.
- Reinstall the Protective Cover
- Secure the cover (1) using six screws and washers (2).
- Tool size: 17 mm
- Torque specification: 50 N·m (37 lbf·ft)
By following these steps, you can safely remove and install the air conditioning compressor on the HITACHI EX5600 excavator. More repair case for Hitachi,please refer to Hitachi excavator trouble repair
Leave a Reply